My share for today is a Bear Card that I designed using SU's A Little Wild and Burlap Stamp Sets and Little Loves Framelits.
Let's take a look:

My Card Base is Soft Suede Cardstock cut at 4-1/4" x 11" and scored and folded at 5-1/2" for a Top Folding Card.
My Card Front Panel is Soft Sky Cardstock cut at 3-5/8" x 4-7/8".
Using SU's new Burlap Stamp, I stamped it onto my Card Front Panel with Soft Sky Ink. What a cool effect and I thought it kind of looked like Honey Comb.
Using SU's Layering Circles Framelits Dies, I die cut the 2-1/4" Scalloped Circle through both the Card Base and the Front Panel at the same time and running it through the BIG Shot Machine twice. (Save the Burlap stamped Scalloped Circle for the inside of the Card.)
I adhered my Card Front Panel to my Card Base with Stampin' Dimensionals.

Using SU's Little Loves Framelits Dies, I die cut 4 of the Long Leaf Stems (one for the inside of my Card). I trimmed two of the Stems to make them shorter and adhered them to the bottom left corner of the Card Front Panel with Mono Multi Purpose Glue as shown in the picture above.
Using SU's A Little Wild Stamp Set, I stamped the Bee Hive and 5 Bee's (one for the inside of my Card) with Basic Black Archival Ink onto Shimmery White Cardstock.

Using my Aqua Painter, I watercolored the Bee Hive and the Bee's with Crushed Curry Ink.

I brushed Wink of Stella onto the Bees' Wing's to give then a nice shine. It's very hard to pick up the Shine in a picture! You can kind of see it in the Bee at the top.

I adhered the Bee Hive over the ends of the Long Leaf Stems with Stampin' Dimensionals.
I adhered 3 of the Bee's to my Card Front Panel and one Bee to the Bee Hive with Mono Multi Purpose Glue.
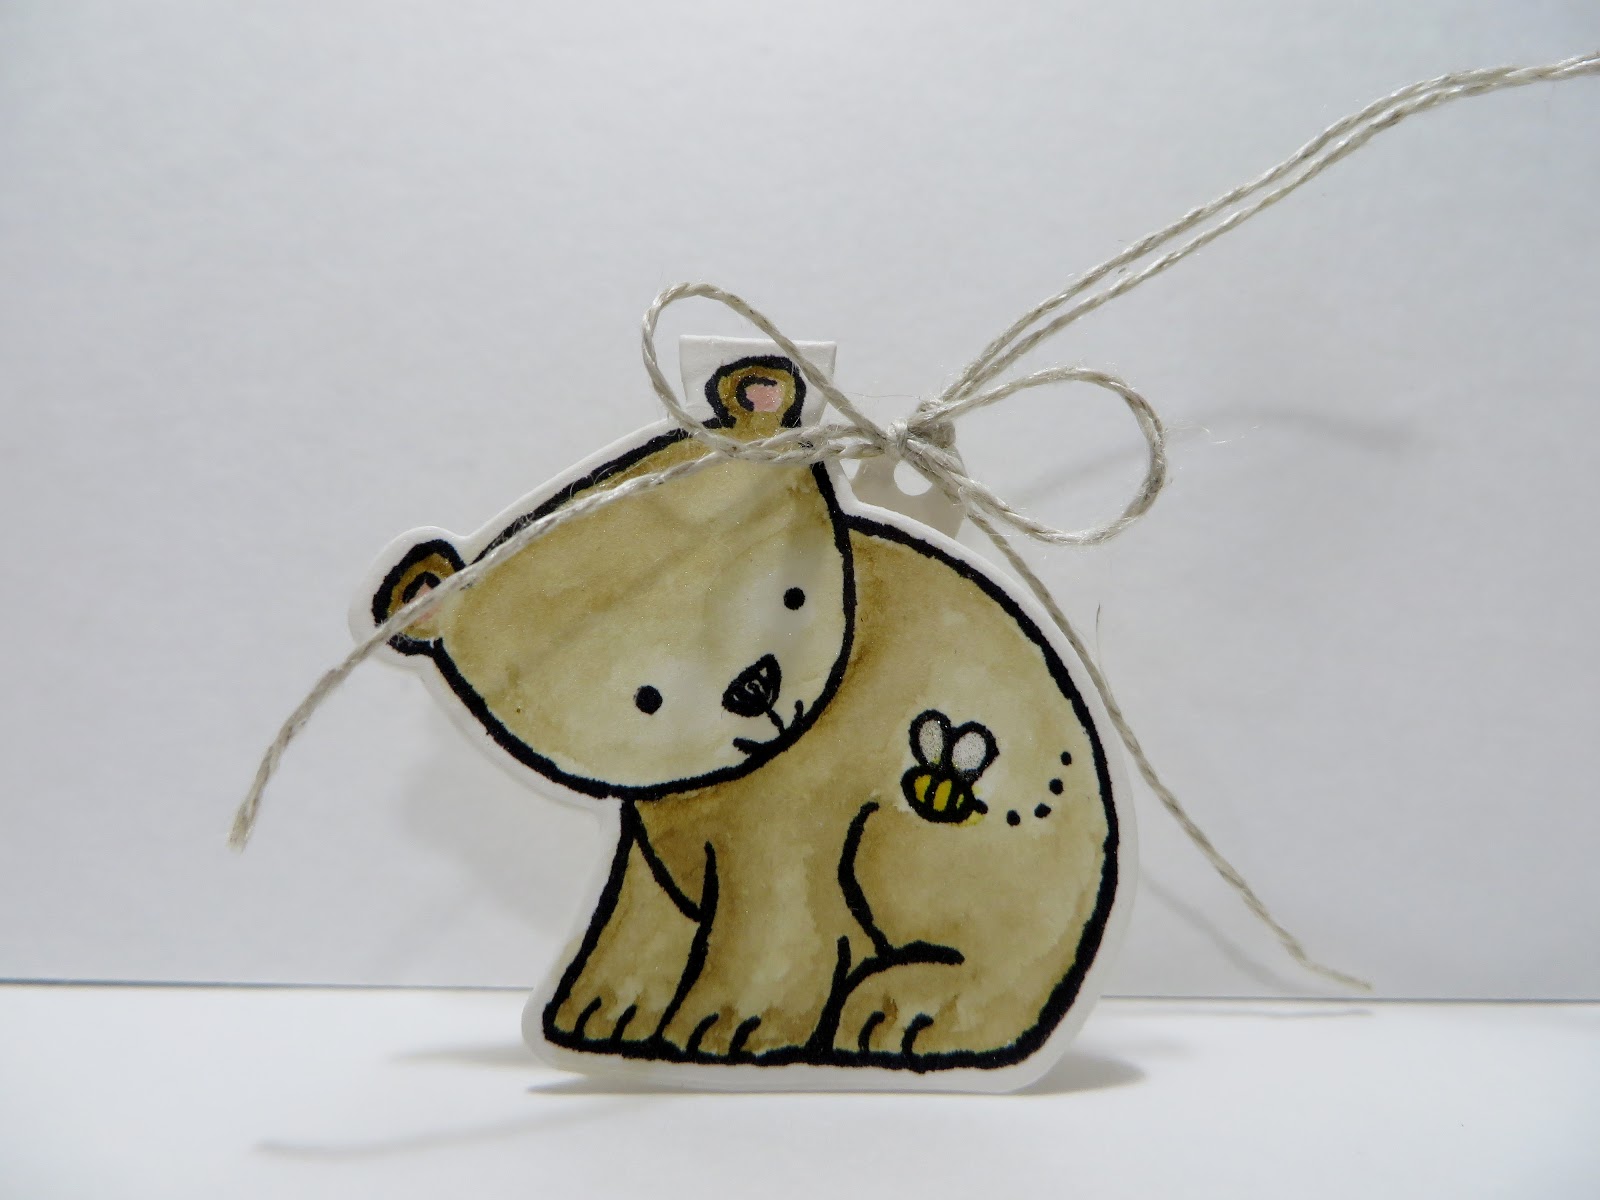
Using SU's A Little Wild Stamp Set, I stamped the Bear in Basic Black Archival Ink onto Shimmery White Cardstock.
Using my Aqua Painter, I watercolored the Front and Back of the Bear with Soft Suede and Blushing Bride Inks and the Bee with Crushed Curry Ink. Again, I brushed some Wink of Stella onto the Bees' Wing's.

Using SU's Little Loves Framelits Dies, I die cut out my Bear Tag.
I tied a long length of doubled Linen Thread to the hole in the Tag. I tied the bottom portion of the Linen Thread in a Bow and knotted the top of the Linen Thread for a Hanger.

For the inside of my Card:
I stamped my Sentiment in Basic Black Archival Ink onto the Burlap stamped Scalloped Circle and on the inside of my Bear Tag.

I adhered the Burlap stamped Scalloped Circle with Mono Multi Purpose Glue to the inside of my Card lining it up centered with the front of the Card's die cut out Scalloped Circle.

I adhered the last Bee above the Sentiment with Mono Multi Purpose Glue.
I adhered the last Long Leaf Stem to the bottom of the Scalloped Circle on an angle with Mono Multi Purpose Glue in the center of the stem only.

I adhered the Hanger portion of the Bear Tag to the inside of my Card with a small piece of SU's new Basics Pack 2 Washi Tape in Daffodil Delight. The Bear Tag can be easily removed!

Pictured above is what the inside of the card looks like when it is completely opened up with the tag removed.

I adhered 4 of SU's Gold Metallic Circles; 3 to the outside of my Card and one to the inside of my Card.
That's all I have for today. Thanks for stopping by my blog.
If you are interested in purchasing Stampin' Up products, you can order from me on-line at www.stampinup.com and please choose me, Lynn Gauthier, as your Demonstrator.
If you would like to visit my Pinterest Boards, Please click on the link below:
Here
If you would like to become a Paper Pumpkin Subscriber with me, Please click on the link below to sign up.
Here
PLEASE GIVE CREDIT WHERE CREDIT IS DUE!
I recently discovered that people are using my cards and/or projects, duplicating them and entering them into challenges, using them for their own card classes and (using them on their blogs as their own creations) - Please give credit where credit is due. My cards and projects are my own creations and are not to be used in challenges, blog hops, card classes or sold at craft shows; etc., for profit. I don't mind if you duplicate my creativity to pass on to family members or friends as gifts or Occasions cards; but, PLEASE be considerate of others creativity! Thank you!
I love this Burlap stamp with this and that little honey pot in the corner is so cute! All of these Wild Things have been wildly cute but this is my favorite! Glad you're feeling better! TFS
ReplyDeleteDarling little honey bear card.....And I have to say....I thought the stamped burlap was embossed at first. Looks SO REAL!
ReplyDelete