We had some rain this morning and we are expecting some more widespread rain and thunderstorms tonight. Our high today is supposed to be in the low 50's so it's still nice out.
My share for
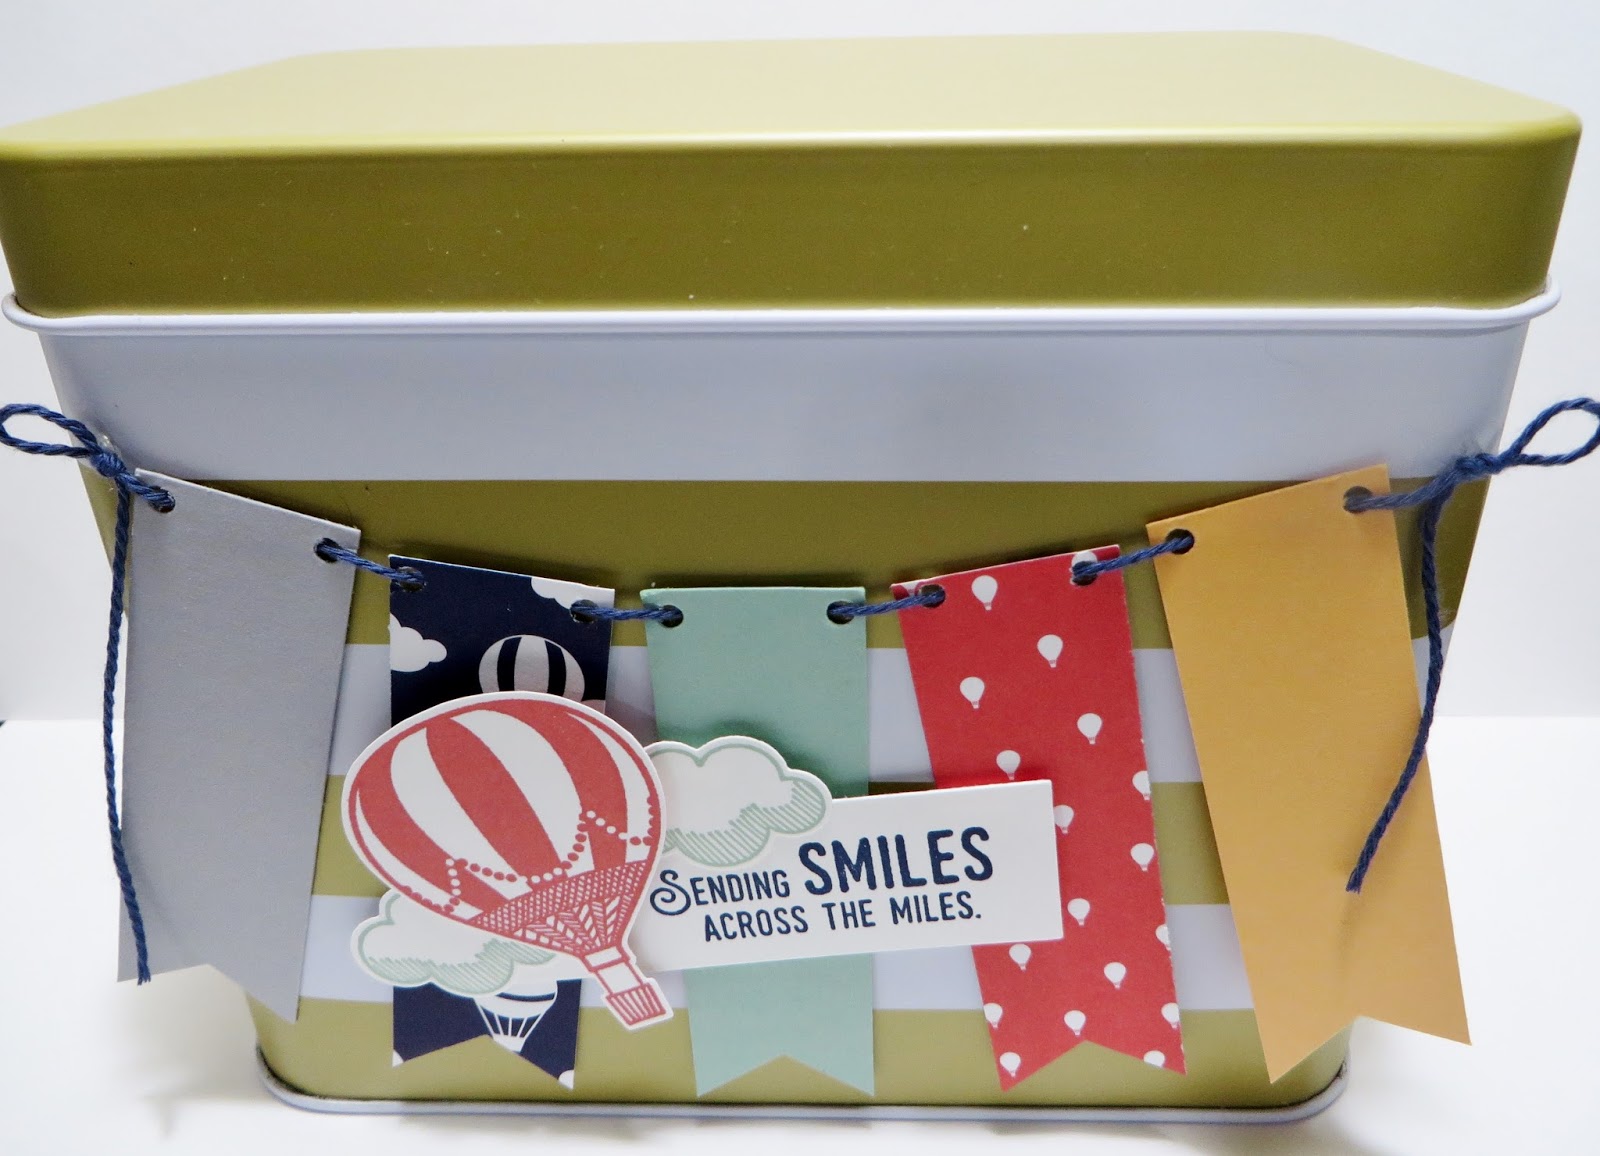
today is 3 more of the 12 cards that are in my Embellished Free
Sale-a-Bration Tin that I posted on my blog yesterday. If you missed yesterday's blog post or want to see it again, you can click on the link below:
http://lynnslocker.blogspot.com/2017/02/stampin-up-carried-away-lift-me-up-up.html
The Stampin' Up products that I used are the Free Sale-a-Bration Tin, the Free SAB
Carried Away Designer Series Paper, the Lift Me Up Stamp Set, the Up and Away
Thinlits Dies and the Triple Banner Punch.
Let's take a look:
The
free SAB Tins are so fun to embellish and I love how mine turned out!
Way too cool! And, I have found so many uses for the Tins.
I
LOVE the Lift Me Up Stamp Set as it has so many great Sentiments and
the Free SAB Carried Away Designer Series Paper as it has so many pretty
designs.
Stampin'
Up provided us with a video tutorial on how to embellish the Tin and
make 12 cards and envelopes to fit in the Tin. Thank you so much
Stampin' Up!!!
For these 3 Cards, my Card Bases are Smoky Slate Cardstock cut at 4-1/4" x 11" and scored and folded at 5-1/2".
My Card Fronts are from the Free SAB Carried Away Designer Series Paper cut at
4" x 5-1/4" and adhered to my Card Bases with Mono Multi Purpose Glue.
My Second Card Front Balloon Panel is Whisper White Cardstock cut at 3" x 3-1/2".
Using
SU's Lift Me Up Stamp Set, I stamped the Large Balloon in Watermelon
Wonder Ink and the Small Balloon in Peekaboo Peach Ink. The 3 clouds
are stamped in Mint Macaron Ink.
I wrapped about 34" of White or Navy Baker's Twine around my Card Fronts about 2/3's of the way down and tied it in a Bow.
I then adhered my Second Card Front Balloon Panel to my Card with Stampin' Dimensionals.
For my Sentiments:
I
trimmed out my Sentiment Banners from Whisper White Cardstock to measure 1" x 3-3/4" and flagged my
ends with SU's Triple Banner Punch. (I did not insert my Banner all the
way into the punch as I didn't want to cut that much off of the
Banner. If you turn your punch up-side-down, you can see how much you
are punching off. I only inserted the Banner to the gray edge of the
underneath opening of the punch.)
Using SU's Lift Me Up Stamp Set, I stamped my Sentiments on my Whisper White Banners with Night of Navy Ink.
For my DSP Banners:
I
trimmed out my Free SAB Carried Away Designer Series Paper to measure
3/4" x 4" and Flagged the ends as I did for the Sentiment Banners
keeping them longer as shown in the picture above.
I
adhered the two Banners together and to my Card with Stampin'
Dimensionals. (Make sure to adhere your Dimensionals towards the bottom
of your Banners.)
These are so fun to make and I really had a production line going.
I
also LOVE how all of Stampin' Up's products color coordinate. No more
looking for items to match the inks or papers in my cards.
Thank you so much, again, Stampin' Up for sharing the video tutorial with us! You're AWESOME!
That's all I have for today. Thanks for stopping by my blog!
If you would like to become a Paper Pumpkin Subscriber with me, Please click on the link below to sign up.
https://www.paperpumpkin.com/en-us/sign-up/?demoid=2124949
If you would like to visit my Pinterest Boards, Please click on the link below:
https://www.pinterest.com/dodge3670/https://www.pinterest.com/dodge3670/
If you are
interested in purchasing Stampin' Up products, you can order from me
on-line at www.stampinup.com and please choose me, Lynn Gauthier, as
your Demonstrator.
PLEASE GIVE CREDIT WHERE CREDIT IS DUE!
I
recently discovered that people are using my cards and/or projects,
duplicating them and entering them into challenges, using them for their
own card classes and (using them on their blogs as their own creations) -
Please give credit where credit is due. My cards and
projects are my own creations and are not to be used in challenges, blog
hops, card classes or
sold at craft shows; etc., for profit. I don't mind if you duplicate my
creativity to pass on to family members or friends as gifts or Occasions
cards; but, PLEASE be considerate of others creativity! Thank you!
Good Monday Morning! The sun is shining full on and it's so pretty. The ice on the river is half gone and the sun shining on the water and ice is so gorgeous. It just glistens and sparkles. So, we are off to a pretty nice sunny day!
My share for today is 3 of the 12 cards that are in my Embellished Free Sale-a-Bration Tin that I posted on my blog last Friday. The Stampin' Up products that I used are the Free Sale-a-Bration Tin, the Free SAB
Carried Away Designer Series Paper, the Lift Me Up Stamp Set, the Up and Away
Thinlits Dies and the Triple Banner Punch.
Let's take a look:
The free SAB Tins are so fun to embellish and I love how mine turned out! Way too cool! And, I have found so many uses for the Tins.
I LOVE the Lift Me Up Stamp Set as it has so many great Sentiments and the Free SAB Carried Away Designer Series Paper as it has so many pretty designs.
Stampin' Up provided us with a video tutorial on how to embellish the Tin and make 12 cards and envelopes to fit in the Tin. Thank you so much Stampin' Up!!!
For these 3 Cards, my Card Bases are Peekaboo Peach Cardstock cut at 4-1/4" x 11" and scored and folded at 5-1/2".
My Card Fronts are from the Free SAB Carried Away Designer Series Paper cut at
4" x 5-1/4" and adhered to my Card Bases with Mono Multi Purpose Glue.
My Second Card Front Balloon Panel is Whisper White Cardstock cut at 3" x 3-1/2".
Using SU's Lift Me Up Stamp Set, I stamped the Large Balloon in Watermelon Wonder Ink and the Small Balloon in Peekaboo Peach Ink. The 3 clouds are stamped in Mint Macaron Ink.
I wrapped about 34" of White or Navy Baker's Twine around my Card Front about 2/3's of the way down and tied it in a Bow.
I then adhered my Second Card Front Balloon Panel to my Card with Stampin' Dimensionals.
For my Sentiments:
I trimmed out my Sentiment Banners to measure 1" x 3-3/4" and flagged my ends with SU's Triple Banner Punch. (I did not insert my Banner all the way into the punch as I didn't want to cut that much off of the Banner. If you turn your punch up-side-down, you can see how much you are punching off. I only inserted the Banner to the gray edge of the underneath opening of the punch.)
Using SU's Lift Me Up Stamp Set, I stamped my Banners with Night of Navy Ink.
For my DSP Banners:
I trimmed out my Free SAB Carried Away Designer Series Paper to measure 3/4" x 4" and Flagged the ends as I did for the Sentiment Banners keeping them longer as shown in the picture above.
I adhered the two Banners together and to my Card with Stampin' Dimensionals. (Make sure to adhere your Dimensionals towards the bottom of your Banners.)
These are so fun to make and I really had a production line going.
I also LOVE how all of Stampin' Up's products color coordinate. No more looking for items to match the inks or papers in my cards.
Thank you so much, again, Stampin' Up for sharing the video tutorial with us! You're AWESOME!
That's all I have for today. Thanks for stopping by my blog!
If you would like to become a Paper Pumpkin Subscriber with me, Please click on the link below to sign up.
https://www.paperpumpkin.com/en-us/sign-up/?demoid=2124949
If you would like to visit my Pinterest Boards, Please click on the link below:
https://www.pinterest.com/dodge3670/https://www.pinterest.com/dodge3670/
If you are
interested in purchasing Stampin' Up products, you can order from me
on-line at www.stampinup.com and please choose me, Lynn Gauthier, as
your Demonstrator.
PLEASE GIVE CREDIT WHERE CREDIT IS DUE!
I
recently discovered that people are using my cards and/or projects,
duplicating them and entering them into challenges, using them for their
own card classes and (using them on their blogs as their own creations) -
Please give credit where credit is due. My cards and
projects are my own creations and are not to be used in challenges, blog
hops, card classes or
sold at craft shows; etc., for profit. I don't mind if you duplicate my
creativity to pass on to family members or friends as gifts or Occasions
cards; but, PLEASE be considerate of others creativity! Thank you!
It started raining in the wee hours of the morning. We were at the freezing mark and the rain is partially freezing on the trees and making the limbs hang down. The temperatures will warm up enough today for a quick thaw though. The Road Commission also worked on our road again yesterday afternoon; but, with all this rain now, it's as bad as it was before. A soupy, muddy, rutty mess!!! We even had an awful Thunderstorm this morning and it got so dark out that our Mercury and Landscape lights came on! Crazy weather!
My share for today is a project I made with one of Stampin' Up's free Sale-a-Bration Tin's, free SAB Carried Away Designer Series Paper, Lift Me Up Stamp Set and Up and Away Thinlits Dies. You'll have to come back on Monday to see what's inside of the Tin!
Isn't this Tin just way too cool!!! Stampin' Up provided us with a video tutorial on how to make this Tin and its contents.
Come back on Monday and I'll show you all the contents in my Tin and more!
That's all I have for today. Thanks for stopping by my blog!
If you would like to become a Paper Pumpkin Subscriber with me, Please click on the link below to sign up.
https://www.paperpumpkin.com/en-us/sign-up/?demoid=2124949
If you would like to visit my Pinterest Boards, Please click on the link below:
https://www.pinterest.com/dodge3670/https://www.pinterest.com/dodge3670/
If you are
interested in purchasing Stampin' Up products, you can order from me
on-line at www.stampinup.com and please choose me, Lynn Gauthier, as
your Demonstrator.
PLEASE GIVE CREDIT WHERE CREDIT IS DUE!
I
recently discovered that people are using my cards and/or projects,
duplicating them and entering them into challenges, using them for their
own card classes and (using them on their blogs as their own creations) -
Please give credit where credit is due. My cards and
projects are my own creations and are not to be used in challenges, blog
hops, card classes or
sold at craft shows; etc., for profit. I don't mind if you duplicate my
creativity to pass on to family members or friends as gifts or Occasions
cards; but, PLEASE be considerate of others creativity! Thank you!
It's a mostly sunny day with the high's in the low to mid 50's. Just a perfect Spring Day for February in Michigan. Tomorrow, we are expecting Thunderstorms all day. That should really make our road even more impassable, again!
My share for today is a GORGEOUS Valentine's Sampler in an IKEA Frame that my Good Friend and Fellow Stampin' Up Demonstrator, Kadie, sent to me to make for Valentine's Day! I just fell in LOVE with it and have been staring at its beauty every day so I asked Kadie if I could put it on my blog to share with all of you and she said "Yes"! Yay! Thank you so much Kadie. I LOVE my Sampler!!!
Let's take a look:
Isn't this just way too cool!!! Sorry for the glare of the camera in the glass!
The Stampin' Up products that Kadie used are Sending Love Designer Series Paper, Sealed with Love and Lift Me Up Stamp Sets and Love Notes Framelits and Up and Away Thinlits Dies.
I also LOVE the color combination that Kadie used: Basic Black, Real Red and Silver. The Silver Embossing and Silver Foil really makes it POP!
Thanks so much Kadie for my Sampler! I've not made one before and just loved putting it together.
That's all I have for today. Thanks for stopping by my blog!
If you would like to become a Paper Pumpkin Subscriber with me, Please click on the link below to sign up.
https://www.paperpumpkin.com/en-us/sign-up/?demoid=2124949
If you would like to visit my Pinterest Boards, Please click on the link below:
https://www.pinterest.com/dodge3670/https://www.pinterest.com/dodge3670/
If you are
interested in purchasing Stampin' Up products, you can order from me
on-line at www.stampinup.com and please choose me, Lynn Gauthier, as
your Demonstrator.
PLEASE GIVE CREDIT WHERE CREDIT IS DUE!
I
recently discovered that people are using my cards and/or projects,
duplicating them and entering them into challenges, using them for their
own card classes and (using them on their blogs as their own creations) -
Please give credit where credit is due. My cards and
projects are my own creations and are not to be used in challenges, blog
hops, card classes or
sold at craft shows; etc., for profit. I don't mind if you duplicate my
creativity to pass on to family members or friends as gifts or Occasions
cards; but, PLEASE be considerate of others creativity! Thank you!
Gosh, did we have the thick, dense fog this morning. It's clearing out in a hurry though. The sun is supposed to come out and warm us up quickly and into the mid to high 60's for today! How awesome is that!
My share for today is four Note Cards that I designed using Stampin' Up's Pop of Pink Designer Series Paper, Falling Flowers and Special Reason Stamp Sets, Adoring Arrows Paper Pumpkin Stamp Set, Succulent, May Flowers and Stylish Stems Framelits Dies and Petal Burst Embossing Folder.
Let's take a look:
I always like to find a different way to use my sentiments like stamping them in the Centers of Flowers or on Leaves.
My Card Bases are Stampin' Up's Kraft Note Cards. I ran the front of my Cards through the BIG Shot using Stampin' Up's Petal Burst Embossing Folder.
I trimmed out a piece of Pop of Pink Designer Series Paper to measure 1/2" x 5" and adhered it vertically on my Card Front with Mono Multi Purpose Glue.
I trimmed out another piece of Pop of Pink DSP to measure 1/2" x 3-1/2" and adhered it horizontally on my Card Front with Mono Multi Purpose Glue.
Using SU's Succulent Framelits Dies, I die cut my Large Flowers from Bermuda Bay and Melon Mambo Cardstock.
I used my Bone Folder to give a slight curl to each petal and adhered them together with Stampin' Dimensionals.
Using SU's Falling Flowers Stamp Set, I stamped the Center Flower in Melon Mambo Ink onto Daffodil Delight Cardstock.
Using SU's January Adoring Arrows Paper Pumpkin Stamp Set, I stamped my Sentiment in the Center of my Flower with Basic Black Archival Ink.
Using SU's May Flowers Framelits Dies, I die cut out my Flower and adhered it to the Center of my Large Flowers with Stampin' Dimensionals.
Using SU's Special Reason Stamp Set, I stamped my Leaves in Old Olive Ink onto Old Olive Cardstock (2 Large Leaves and 1 Small).
Using SU's January Adoring Arrows Paper Pumpkin Stamp Set, I stamped my Sentiment in the Center of the Leaves with Basic Black Archival Ink.
Using SU's Stylish Stems Framelits Dies, I die cut out my Leaves.
I adhered my Large Flowers to my Card Fronts with Mono Multi Purpose Glue.
I adhered my 2 Large Leaves and 1 Small Leaf underneath the Petals of the Flowers with a dab of Mono Multi Purpose Glue on the end of each Leaf.
I adhered a Large Basic Jewel Pearl (Retired) to the Centers of the Flowers without the Sentiments in the Centers.
Using SU's Melon Mambo and Bermuda Bay Thick Baker's Twine, I tied Bows and adhered them to my cards as shown in the pictures with a dab of Mono Multi Purpose Glue.
I didn't stamp a Sentiment on the inside of my Cards yet. I'll wait until I have an occasion to send them out and then stamp my Sentiments.
These were actually very quick and easy Note Cards to make. I just LOVE those HUGE Flowers!!!
That's all I have for today. Thanks for stopping by my blog!
If you would like to become a Paper Pumpkin Subscriber with me, Please click on the link below to sign up.
https://www.paperpumpkin.com/en-us/sign-up/?demoid=2124949
If you would like to visit my Pinterest Boards, Please click on the link below:
https://www.pinterest.com/dodge3670/https://www.pinterest.com/dodge3670/
If you are
interested in purchasing Stampin' Up products, you can order from me
on-line at www.stampinup.com and please choose me, Lynn Gauthier, as
your Demonstrator.
PLEASE GIVE CREDIT WHERE CREDIT IS DUE!
I
recently discovered that people are using my cards and/or projects,
duplicating them and entering them into challenges, using them for their
own card classes and (using them on their blogs as their own creations) -
Please give credit where credit is due. My cards and
projects are my own creations and are not to be used in challenges, blog
hops, card classes or
sold at craft shows; etc., for profit. I don't mind if you duplicate my
creativity to pass on to family members or friends as gifts or Occasions
cards; but, PLEASE be considerate of others creativity! Thank you!
We got a little bit of rain overnight and into this morning which just made our road even worse. Our Consumers Energy Meter Reader almost got stuck; but, fortunately, he made it out and on his way! Phew! You should have seen the mud on his card. We are supposed to have high's well into the 50's again today. Nice!
My share for today are two cards that I designed using SU's Suite Sentiments Stamp Set, May Flowers Framelits and Detailed Dragonfly Thinlets Dies, Sending Love and Cupcakes & Carousels Embellishments and Stampin' Up's new Sale-a-Bration Glimmer Papers.
Stampin' Up added two new Stamp Sets, Reverse Words & Make a Medallion, and a 6" x 6" Glimmer Paper Assortment Pack in Bermuda Bay, Mint Macaron and Sweet Sugarplum colors. Being a Stampin' Up Demonstrator, I was able to order the new items early so my cards today are made with the new Glimmer Papers.
Let's take a look:
Wowzers, is that some Glimmer Paper or What!!! I'm in LOVE!!! =)
My Card Base for the first card is Night of Navy and Sweet Sugarplum Cardstock for my second card. Both were cut at 5-1/2" x 8-1/2" and scored and folded at 4-1/4".
My Card Front Panels are Sweet Sugarplum and Night of Navy Cardstock cut at 4" x 5-1/4".
I trimmed out a piece of Night of Navy and Sweet Sugarplum Cardstock at 1" x 4".
I adhered a piece of SU's Mint Macaron 5/8" Mini Striped Ribbon around each 1" x 4" piece and then to my Card Front Panels with Mono Multi Purpose Glue.
I adhered my Card Front Panels to my Card Bases with Stampin' Dimensionals.
Using SU's Detailed Dragonfly Thinlits Dies, I die cut two Dragonflies from SU's new Bermuda Bay, one from Mint Macraron and one from Sweet Sugarplum Glimmer Papers. (The 2 Bermuda Bay dragonflies are on the outside of my cards and the other 2 are on the inside of my cards which I'll show later on in this post.)
I took a couple scraps of Bermuda Bay Cardstock and trimmed out the Wings of the Dragonflies and adhered them to the Back of each Bermuda Bay Dragonfly with Mono Multi Purpose Glue.
Using SU's May Flowers Framelits Dies, I die cut my Flowers and Leaves from Mint Macaron and Sweet Sugarplum Glimmer Papers and Sweet Sugarplum Cardstock.
I assembled all my Flowers and Leaves using Mono Multi Purpose Glue and then adhered the entire piece to my Card Front with Stampin' Dimensionals. (I used my Petal Roller Tool to gently cup some of the Flower Petals and Leaves to give them more dimension.)
I adhered the two Wooden Flower Elements as shown in the picture above from SU's Sending Love Embellishments to the center of each Flower with Mono Multi Purpose Glue.
For the inside of my Cards:
Using SU's Suite Sentiments Stamp Set, I stamped my Sentiment on one of the tags from SU's Cupcakes & Carousels Tags in Night of Navy Ink. I then adhered the Tag and one of the Dragonflies with Mono Multi Purpose Glue.
I am so LOVIN' the new Glimmer Papers.
I randomly adhered 3 of the Gold Sequins from the Cupcakes & Carousels Embellishment Kit to the front of my Cards with Mono Multi Purpose Glue.
I hope you get the chance to play with some of the new Glimmer Papers! They are even more awesome in person and my pictures cannot capture the real life beauty of this papers.
That's all I have for today. Thanks for stopping by my blog!
If you would like to become a Paper Pumpkin Subscriber with me, Please click on the link below to sign up.
https://www.paperpumpkin.com/en-us/sign-up/?demoid=2124949
If you would like to visit my Pinterest Boards, Please click on the link below:
https://www.pinterest.com/dodge3670/https://www.pinterest.com/dodge3670/
If you are
interested in purchasing Stampin' Up products, you can order from me
on-line at www.stampinup.com and please choose me, Lynn Gauthier, as
your Demonstrator.
PLEASE GIVE CREDIT WHERE CREDIT IS DUE!
I
recently discovered that people are using my cards and/or projects,
duplicating them and entering them into challenges, using them for their
own card classes and (using them on their blogs as their own creations) -
Please give credit where credit is due. My cards and
projects are my own creations and are not to be used in challenges, blog
hops, card classes or
sold at craft shows; etc., for profit. I don't mind if you duplicate my
creativity to pass on to family members or friends as gifts or Occasions
cards; but, PLEASE be considerate of others creativity! Thank you!
It was 63 degrees here on Saturday and we broke lots of records in Michigan going back to the 1930's. Yesterday was 58 and today is supposed to be 57. Crazy, crazy Michigan weather! I'm taking it with a BIG smile!!!
My share for
today is the Trifold Gift Card Holder in a Cool Treats Card Class that Stampin' Up
designed for their Stampin' Up Demonstrators to share with our
Customers. I liked this class for several reasons (besides 3 awesome
cards and a gift card holder): different size of cards that I haven't
made yet, the use of Washi Tape, a lot of stamping and making my own
envelopes.
The Stampin' Up
products that I used are Tasty Treats Specialty Designer Series Paper,
Cool Treats Stamp Set and Frozen Treats Framelits Dies.
Let's take a look at my Trifold Gift Card Holder:
I LOVE that Stampin' Up used the Sunburst pattern from the Tasty Treats Designer Series Specialty Paper for the top of the ice cream cone. So cute!!!
The Gift Card Holder Base is Crumb Cake Cardstock cut at 3-1/2" x 7-1/2" and scored and folded at 2-1/2" and 5".
The Front Panel is the Crumb Cake Diamond pattern from the Tasty Treats DSSPaper cut at 2-1/4" x 3-1/4"and adhered to the first Gift Card Holder panel on an angle with Mono Multi Purpose Glue.
The Second Front Panel is Whisper White Cardstock cut at 2" x 3".
Using SU's Cool Treats Stamp set, I stamped the word 'SWEET' in Pool Party Ink 5 times. I started by stamping the Center 'SWEET' first and then the two Above and then the two the two Below.
I adhered a strip of SU's Cool Treats Designer Washi Tape, tied about 12" piece of Old Olive Baker's Twine around the panel and into a bow and then adhered the Panel with Stampin' Dimensionals.
Using SU's Frozen Treats Framelits Dies, I die cut my Ice Cream Cone pieces from Chocolate Chip, Crumb Cake, Real Red and Soft Suede Cardstocks and the Ice Cream from the Sunburst pattern in the Tasty Treats DSSPaper.
Using SU's Cool Treats Stamp Set, I stamped the Base of the Ice Cream Cone in Crumb Cake Ink and then assembled my Ice Cream Cone as shown in the picture above. I adhered the Base of the Ice Cream Cone with Mono Multi Purpose Glue and the Top of the Ice Cream Cone with Stampin' Dimensionals.
Using SU's Cool Treats Stamp Set, I stamped the Sentiment twice in Pool Party Ink onto Whisper White Cardstock and trimmed the words out with my Snips. I adhered them to the Ice Cream Cone with Mono Multi Purpose Glue.
I adhered 3 of the Yellow Plastic Spheres from SU's Sprinkles Embellishments with Mono Multi Purpose Glue.
For the inside of my Trifold Gift Card Holder, I stamped my Sentiment in Crumb Cake Ink on the Center Panel and adhered another strip of Tasty Treats Designer Washi Tape to the Right side of the Right Panel.
I trimmed out a piece of the Pool Party Grid Pattern to measure 5-1/2" x 5-1/2" for a 3-1/2" x 5" Card size to make my Envelope. I lined the Left Edge of the paper up to the 3-1/8"
Mark on the Envelope Punch Board and punched and scored the paper. I
then lined up the score lines with the notch on the Envelope Punch Board
and punched and scored three more times rotating my paper after each
punch and score.
I then assembled my Envelope with SU's Tear & Tape
Adhesive Tape.
What a Fun, Fun Gift Card Holder and I loved creating something different!
That's all I have for today. Thanks for stopping by my blog!
If you would like to become a Paper Pumpkin Subscriber with me, Please click on the link below to sign up.
https://www.paperpumpkin.com/en-us/sign-up/?demoid=2124949
If you would like to visit my Pinterest Boards, Please click on the link below:
https://www.pinterest.com/dodge3670/https://www.pinterest.com/dodge3670/
If you are
interested in purchasing Stampin' Up products, you can order from me
on-line at www.stampinup.com and please choose me, Lynn Gauthier, as
your Demonstrator.
PLEASE GIVE CREDIT WHERE CREDIT IS DUE!
I
recently discovered that people are using my cards and/or projects,
duplicating them and entering them into challenges, using them for their
own card classes and (using them on their blogs as their own creations) -
Please give credit where credit is due. My cards and
projects are my own creations and are not to be used in challenges, blog
hops, card classes or
sold at craft shows; etc., for profit. I don't mind if you duplicate my
creativity to pass on to family members or friends as gifts or Occasions
cards; but, PLEASE be considerate of others creativity! Thank you!