Get ready to order your Valentine's and other new Stampin' Up products from the new 2017 Occasions Catalog on January 4, 2017.
And, Sale-A-Bration begins on January 4, 2017 and runs through March 31st. During
Sale-A-Bration, you get a free item of your choice from the Sale-A-Bration brochure for every $50 you spend (before shipping and tax).
My share for today is a Treat Holder Box and a Battery Light Box that I designed using Stampin' Up's new Sending Love Designer Series Paper Stack, Sealed with Love, Yummy in My Tummy and You've Got This Stamp Sets and Love Notes & Layering Circles Framelits Dies.
Let's take a look:

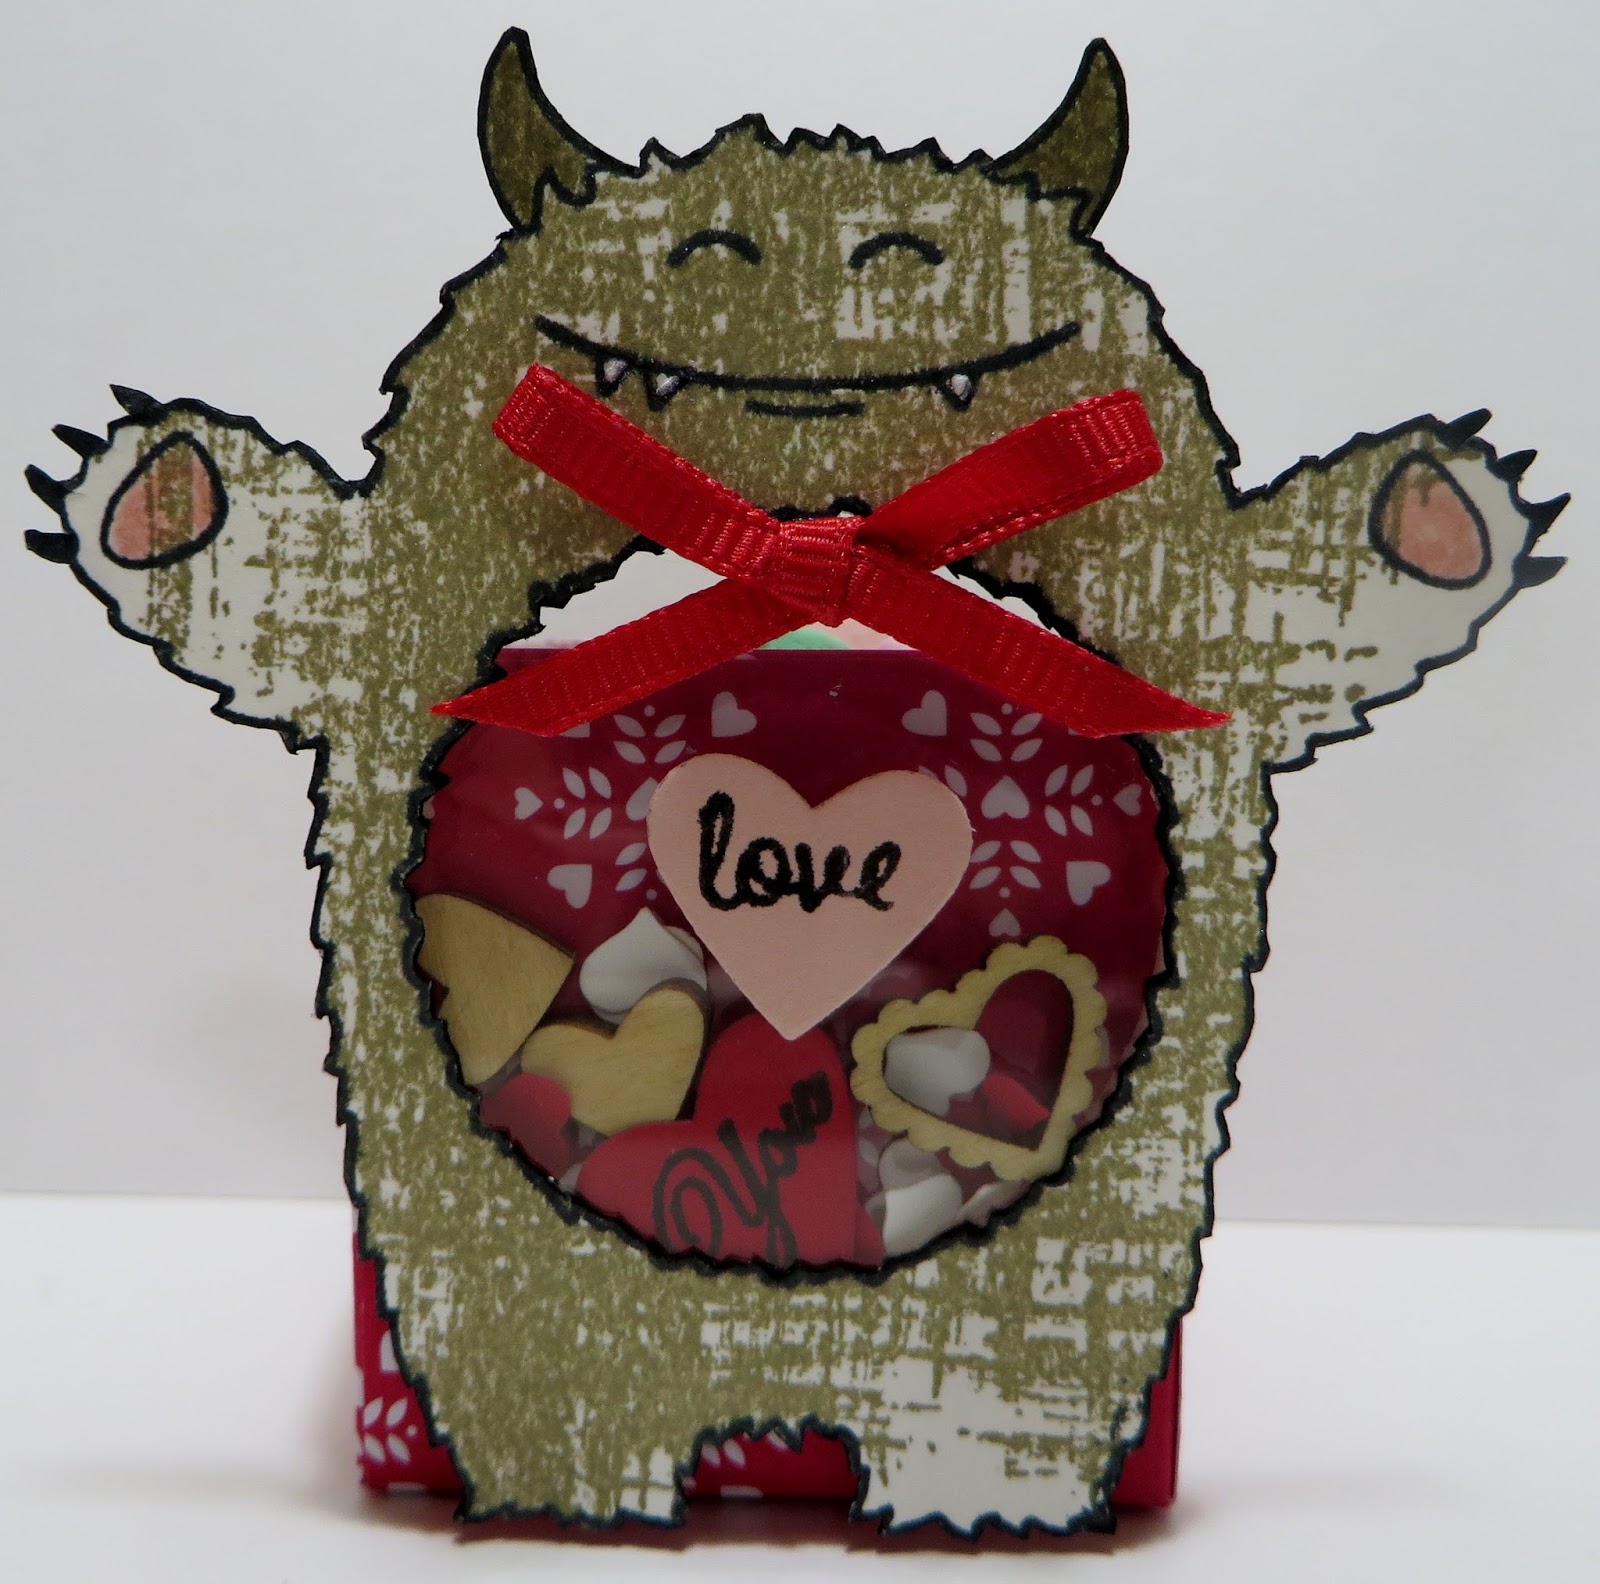
Aren't they cute!!! I just smile BIG time when I look at these Valentine's Smiley Monsters.

Here's a picture of the back of the Battery Light Box and Treat Box Holders.

The new Sending Love Designer Series Paper Stack has the most perfect designs for Valentine's Day. You get 48 Sheets: 6 Each of 8 Double-Sided Designs of 6" x 6" Paper. And, it's also the perfect size for the 2" x 2" x 2" Battery Light and Treat Holder boxes that I made for the Happy Monsters.
.
I selected my 6" x 6"sheet of DSP from the Paper Stack and scored it on all four sides at 2". I cut my flaps up to the score line on all four corners as shown in the above picture.

I flipped my sheet of DSP over and adhered SU's Tear & Tape Adhesive as shown in the above picture. I then removed the adhesive backing and folded each corner up to form the box.
Using SU's You've Got This Stamp Set from the Annual Catalog, I stamped the Large Background Stamp onto SU's Shimmery White Cardstock with Soft Suede Ink.
Using SU's new Yummy in My Tummy Stamp Set, I stamped the Happy Monster in Basic Black Archival Ink right over the Soft Suede Ink on the Shimmery White Cardstock. I then fussy cut the Happy Monster out with my Snips.
I used my 1-1/2" Circle Punch to punch a hole in the Happy Monsters Tummy and then fussy cut the rest of the Tummy out.

I then adhered a Foam Adhesive Circle (Retired) around the outer edge of the Circle to create my Shaker. SU now sells the Foam Adhesive Strips which can be used in place of the Circles.
Using SU's new Love Notes Framelits Dies, I die cut the Small Heart from Blushing Bride and Real Red Cardstocks.
Using SU's new Sealed with Love Stamp Set, I colored in the word 'love' from one of the stamps with my Basic Black Stampin' Write Marker. I then 'Huffed' on the stamp and stamped it in the middle of the Blushing Bride Heart. I also colored in the word 'You' from another stamp, huffed on it and stamped it on the Real Red Heart.
I adhered the 'love' Blushing Bride Heart to the front of my Shaker with Mono Multi Purpose Glue.
Using SU's Heart Confetti Punch, I punched some Hearts from Whisper White and Real Red Cardstock and put them in my Shaker. I also put the 'You' Real Red Heart and some of SU's new Sending Love Wood Embellishments inside my Shaker.
I adhered the second Window Sheet Circle to the Foam Adhesive Circle to seal up my Shaker.

I colored in the Happy Monsters Paws with my Blushing Bride Stampin' Write Marker, its Horns with Soft Suede, its Claws with Basic Black and its Teeth with my Signo White Gel Pen.
Using SU's new Sending Love Real Red 1/8" Grosgrain Ribbon, I tied a Bow and adhered it to the top of the Window Sheet Circle with Mono Multi Purpose Glue. The 1/8" Grosgrain Ribbon comes in a Combo Pack with the other color being Whisper White.
I then adhered the Happy Monster to the front of the Box with Mono Multi Purpose Glue.

I stamped, fussy cut and colored the Happy Monster the same as the first one except I colored its teeth with my Soft Suede Stampin' Write Marker.

For the Shaker: Using SU's new Yummy in My Tummy Stamp Set, I stamped the 'Hugs' stamp in Black Memento Ink onto the front of the Window Sheet Circle.
I filled the Shaker with a tiny bit of SU's Real Red Glitter Embossing Powder and a tiny bit of SU's White Mica Flakes. I probably should have added a bit more of the White Mica Flakes as they took on the Real Red color of the Glitter Embossing Powder. I also filled it with some of SU's Bright Sequin Assortment; but, I only added the Heart Sequins and not the other shapes.

I trimmed a section out of the front of the Box as shown in the picture above as I wanted the light from the Battery Light to shine through the Shaker.

I am Over-the-Moon happy with the way my Valentine's Happy Monsters Shaker Projects turned out. Love, love and LOVE!!!
Don't forget about Stampin' Up's HUGE Sale that's still going on!!!
That's all I have for today. Thanks for stopping by my blog!
If you would like to become a Paper Pumpkin Subscriber with me, Please click on the link below to sign up.
https://www.paperpumpkin.com/en-us/sign-up/?demoid=2124949
If you would like to visit my Pinterest Boards, Please click on the link below:
https://www.pinterest.com/dodge3670/https://www.pinterest.com/dodge3670/
If you are interested in purchasing Stampin' Up products, you can order from me on-line at www.stampinup.com and please choose me, Lynn Gauthier, as your Demonstrator.
PLEASE GIVE CREDIT WHERE CREDIT IS DUE!
I recently discovered that people are using my cards and/or projects, duplicating them and entering them into challenges, using them for their own card classes and (using them on their blogs as their own creations) - Please give credit where credit is due. My cards and projects are my own creations and are not to be used in challenges, blog hops, card classes or sold at craft shows; etc., for profit. I don't mind if you duplicate my creativity to pass on to family members or friends as gifts or Occasions cards; but, PLEASE be considerate of others creativity! Thank you!


