Stampin’ Up! is offering a great host reward to kick off the new catalog ordering! You get an extra $35 in host cash/Stampin’ Rewards for an order or party totaling $350
Promotion Details:
- Promotion dates: June 1–30.
- All orders qualify for this promotion.
- Starter Kit orders do not qualify for this promotion, however the extra Stampin’ Rewards can be used towards the purchase of the Starter Kit.
- The qualifying amount must be reached with commissionable merchandise prior to shipping and tax.
- The additional Stampin’ Rewards offered during this promotion will only be awarded once per order.
- Make sure you open and close your orders during the time frame of this promotion (June 1-30) to earn the extra Stampin’ Rewards.
- Promotion Ends: June 30, 2017 at 11:50 PM (MT).

Here's the link to the Stampin' Up Store https://www.stampinup.com/ECWeb/ and please choose me, Lynn Gauthier, as your Demonstrator.
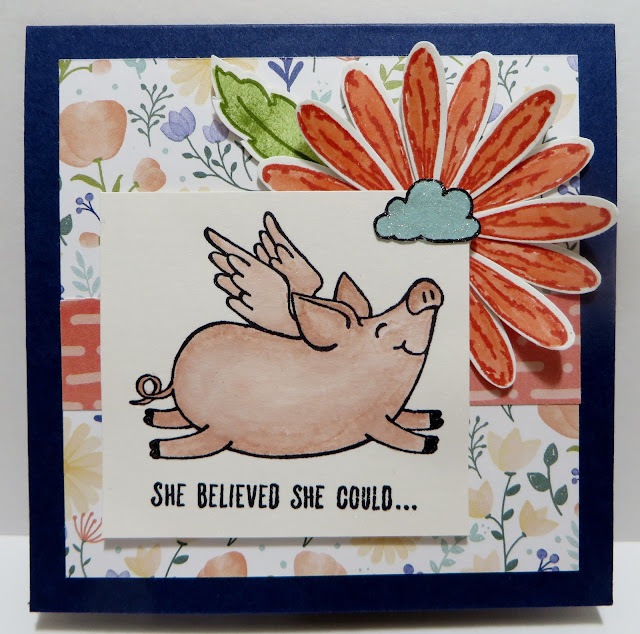
My share for today is an Encouragement Card that I designed using Stampin' Up's new Delightful Daisy Designer Series Paper, This Little Piggy and Daisy Delight Stamp Sets, Daisy Punch and Layering Squares Framelits Dies.
Let's take a look:
Stinkin' cute Little Piggy again and again, eh! =) I have such a passion for all things animals and SU's This Little Piggy Stamp Set caught my eye immediately in the new 2017-2018 Annual Catalog! Love, love and love these Little Piggy's!!!
My Card Base is Night of Navy Cardstock cut at 4" x 8" and scored and folded at 4" for a top folding Card.
My Card Front Panel is the Larger Daisy/Flower Pattern in SU's new Delightful Daisy Designer Series Paper cut at 3-1/2" x 3-1/2" and adhered to my Card Base with Mono Multi Purpose Glue.
I trimmed out a strip of the Calypso Coral Dashed Pattern (the Reverse Side) to measure 3/4" x 3-1/2" and adhered it to my Card with Mono Multi Purpose Glue about 1-1/8" from the bottom of the Strip and to the bottom of the Larger Daisy/Flower Pattern DSP.
Using SU's new Daisy Delight Stamp Set, I stamped 3 Daisy's in Calypso Coral Ink (One Daisy is for the inside of the Card) and colored them in with my Calypso Coral Water Color Pencil. I punched them out with SU's new Daisy Punch. (The Daisy Punch is on Back Order already).
Using Daisy Delight Stamp Set, I stamped 2 of the Solid Leaf Image in Old Olive Ink by stamping off once onto Whisper White Cardstock and then stamping it again without re-inking. I then stamped the Detailed Leaf Image stamp in full strength Ink over the Solid Leaf Images as shown in the picture above and then I fussy cut them out.
I also stamped the Little Cloud Stamp in Basic Black Archival Ink onto Pool Party Cardstock. I fussy cut out the cloud and brushed on some Wink of Stella.
Using SU's new This Little Piggy Stamp Set, I stamped the Piggy in Basic Black Archival Ink onto Shimmery White Cardstock.
Using my Aqua Painter Brush, I water colored the Piggy with Blushing Bride Ink.
Using my Stampin' Write Markers, I colored the Piggy's hooves with Basic Black, the Ground with Soft Suede and the Grass with Old Olive.
I trimmed out the Piggy to measure about 2-3/8" x 2-7/8".
I adhered the 2 Daisy's together with a little Mono Multi Purpose Glue in the centers of the Daisy's only and then to my Card as shown in the picture above.
I adhered my water colored Piggy with Stampin' Dimensionals as shown in the picture above. Isn't he cute! It's like he is smelling both Daisy's.
I adhered one of the Leaves under the Daisy with a little Mono Multi Purpose Glue on the end of the Leaf only as shown in the picture above.
I adhered the Little Cloud with Mono Multi Purpose Glue as shown in the picture above.
For the inside of my Card: Using SU's new This Little Piggy Stamp Set, I stamped my Sentiment in Basic Black Archival Ink onto Whisper White Cardstock.
Using SU's Layering Squares Framelits Dies, I die cut out the Sentiment out with the Largest Scalloped Square.
I took the last punched Daisy and trimmed off 2 sections with 3 Daisy Petals each and adhered them together with Mono Multi Purpose Glue and to the inside of my Card as shown in the picture above.
I adhered the last Leaf under the Daisy with Mono Multi Purpose Glue.
Love, Love and LOVE these Little Piggy's!!!
That's all I have for today! I hope you enjoyed my blog post and thanks for stopping by!
If you are interested in purchasing Stampin' Up products, you can order from me on-line at www.stampinup.com and please choose me, Lynn Gauthier, as your Demonstrator.
If you would like to visit my Pinterest Boards, Please click on the link below:
Here
If you would like to become a Paper Pumpkin Subscriber with me, Please click on the link below to sign up.
Here
PLEASE GIVE CREDIT WHERE CREDIT IS DUE!
I recently discovered that people are using my cards and/or projects, duplicating them and entering them into challenges, using them for their own card classes and (using them on their blogs as their own creations) - Please give credit where credit is due. My cards and projects are my own creations and are not to be used in challenges, blog hops, card classes or sold at craft shows; etc., for profit. I don't mind if you duplicate my creativity to pass on to family members or friends as gifts or Occasions cards; but, PLEASE be considerate of others creativity! Thank you!


No comments:
Post a Comment