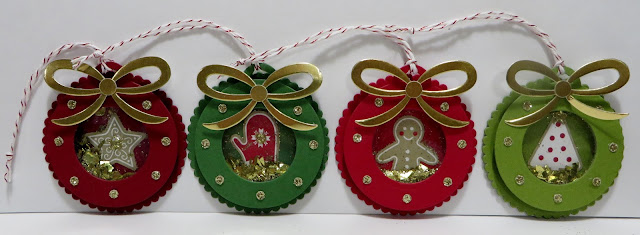
My share for today is 4 Ornament/Tags that I designed using the following Stampin' Up products; Candy Cane Lane Designer Series Paper, Merry Tags & Layering Circles Framelits & Pretty Pines Thinlits Dies.
Let's take a look:
I'm so addicted to making shakers and these little Tags/Ornaments are just Shaking Cute!!!
Using Stampin' Up's Layering Circles Framelits Dies, I die cut my 2-1/4" Scalloped Circles from Cherry Cobbler, Garden Green, Real Red and Old Olive Cardstocks for the Back of my Shaker Tags/Ornaments.
I fussy the Star from SU's Candy Cane Lane Designer Series Paper and adhered it to the center of the Scalloped Circle.
It's kind of hard to see with all the Glitter; but, I adhered a Gold Star Enamel Shape to the center of the Star.
Using SU's Merry Tags Framelits Dies, I die cut the Solid Ornament Die for the Top of my Shaker Tags/Ornaments and then used the Small Circle Die to die cut the center for my Windows.
I die cut 1-1/2" Circles from SU's Window Sheets and adhered them to the Back of the Solid Ornaments to create the holes for my Windows.
I adhered SU's Foam Adhesive Strips to the Back of the Ornament Die Cut around the Outside edge of the Window Circle.
I made a small pile of SU's Gold Glitter and Gold Mica Flakes on Top of the Star on the Scalloped Circle and then pulled off the adhesive backing from the Top Window Ornament and adhered it over the top of the Star, Glitter and Mica Flakes.
Using SU's Whisper White with Red Metallic Thread Baker's Twine, I tied a hanger on each Tag/Ornament and knotted the two ends together at the top.
I die cut the Bows from SU's Gold Foil Paper and adhered them to the top of each Tag/Ornament with Stampin' Dimensionals. Using my 1/4" Handheld Circle Punch, I punched 4 Circles from Gold Foil Paper and adhered them to the Center of my Bows with Mono Multi Purpose Glue.
Using my 1/8" Handheld Circle Punch, I punched 7 Circles from SU's Gold Glimmer Paper and adhered them evenly around the front of the Tags/Ornaments with Mono Multi Purpose Glue.
For this Tag/Ornament, I fussy cut the Mitten from the Candy Cane Lane DSP. I adhered a Gold Circle Enamel Shape on the top of the Mitten.
For this Ornament, I fussy cut out the Gingerbread Man from the Candy Cane Lane DSP.
For this Tag/Ornament, I fussy cut out the Tree from the Candy Cane Lane DSP. I adhered a Gold Star Enamel Shape to the top of the Tree.
I'm really Shaken Up Happy with the way my Shaker Tags/Ornaments turned out!!!
I hope I inspired you to make a Shaker Card or Tag or Ornament. Keep Shakin'!!!
That's all I have for today. Thanks for stopping by my blog!
PLEASE GIVE CREDIT WHERE CREDIT IS DUE!
I recently discovered that people are using my cards and/or projects, duplicating them and entering them into challenges, using them for their own card classes and (using them on their blogs as their own creations) - Please give credit where credit is due. My cards and projects are my own creations and are not to be used in challenges, blog hops, card classes or sold at craft shows; etc., for profit. I don't mind if you duplicate my creativity to pass on to family members or friends as gifts or Occasions cards; but, PLEASE be considerate of others creativity! Thank you!
If you are interested in purchasing Stampin' Up products, you can order from me on-line at www.stampinup.com and please choose me, Lynn Gauthier, as your Demonstrator.


Okay Lynn.....these are ADORABLE. Might have to try making some of those next week when my Saddle-UP! event is over. LOVE 'EM!!!!!
ReplyDeleteSuper cute project, Lynn! I can see these tied to a package for a little something special or to a treat too. They look like a lot of fun to make. Thanks for sharing your creativity with us!!
ReplyDeletethese are so pretty Lynn. Thankyou for sharing these pretty xmas decorations which you have designed.
ReplyDeleteThank you Heather, Dawn and Kadie for all your kind comments. These ornaments are so easy and fun to make and very addicting too! =) I'm so glad I could inspire you! Blessings!
ReplyDeleteI absolutely adore YOUR ideas. I've been looking for an ornament to put onto the cards I make for family for Christmas this year. I hope that it's ok for me to use your templates? The cards will NOT be entered into any contests or such as these are your ideas!
ReplyDeleteThanks so much Lori for your Sweet comments. I'm so glad that I could inspire you. Please feel free to make the Ornaments for your Family and Friends. No worries here! It's just that I've had 3 people now that have sold my designs in their card classes and entered my designs in Challenges...which I just don't think is right nor fair to me!
DeleteEnjoy making the Ornaments and I hope you continue to visit my blog!!!
Blessings! Lynn