The kit included:
Season of Gratitude Stamp Set
Chocolate Chip Classic Stampin' Spot
8 Kraft Card Bases
8 Printed Envelopes
8 Window Sheets
8 Vanilla Embossed Sheets
5 Sheets Die Cut Elements
5 Yards Green Baker's Twine
Sequins (3 Sizes in 4 Colors)
2 Sheets Foam Adhesive Strips (2 Sizes)
150 Adhesive Dots
My share for today is an Alternate Stampin' Up Season of Gratitude Paper Pumpkin card that I designed.
Let's take a look:
First, here is the first shaker card that I made per the kit's instructions.
And, here is one of the Alternate cards that I designed from the kit.
I started out with one of the card bases that came in the kit.
I trimmed out one of the Vanilla Envelopes to obtain a piece that is 4" x 5-1/4" and adhered it to my card base with Mono Multi-Purpose Glue.
I took each die cut leaf left over from the shaker cards and laid them in the following ink pads: Delightful Dijon, Cajun Craze and Pumpkin Pie. I love how each embossed Leaf die cut picked up the colors from the ink pads.
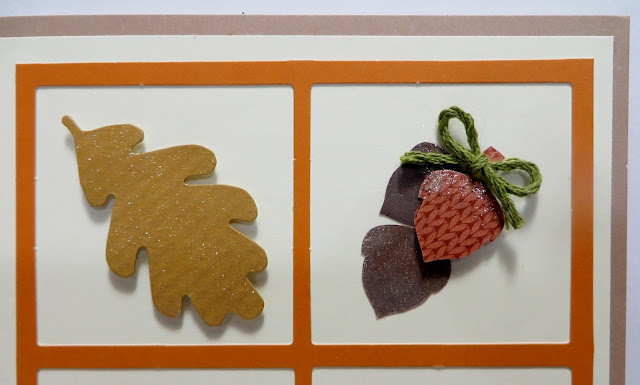
After pressing out the square die cuts from the Pumpkin Pie Sheet, I was left with the thin strips of 4 squares so I used it to put a die cut Leaf in three of the squares. I adhered this piece to the top portion of my card and adhered 3 of the Leaves using Stampin' Dimensionals. I brushed Wink of Stella on each Leaf.
I stamped 3 Acorns; one on the back of a pattern printed piece of the envelope and two Acorns on the Vanilla front of the envelop, all with Chocolate Chip Ink. I fussy cut them out and adhered the two Chocolate Chip Acorns inside the square with Mono Multi-Purpose Glue. I adhered the pattern printed Acorn to the other two Acorns with a Stampin' Dimensional. I brushed Wink of Stella on the caps of the acorns.
I trimmed out a piece of the pattern printed envelope at 1" x 3-1/8" and adhered it underneath the squares with Mono Multi-Purpose Glue.
I stamped my Sentiment in Chocolate Chip Ink on to the Vanilla side of the envelope, trimmed it out to 3/4" x 2-3/8" and adhered it to the pattern printed envelope piece with Stampin' Dimensionals.
Using the Green Baker's Twine included in the kit, I tied a small bow and adhered it to the top of the acorns with Mono Multi-Purpose Glue.
It's really hard to capture the glittery shine of the Wink of Stella in a picture. It just doesn't do it justice.
And, of course, I adhered one of each size of the Sequins next to my Sentiment using SU's Fine Tip Glue Bottle.
That's all I have for today. Thanks for stopping by my blog!
I recently discovered that people are using my cards and/or projects, duplicating them and entering them into challenges and using them for their own card classes. My cards and projects are my own creations and are not to be used in challenges, blog hops, card classes or sold at craft shows; etc., for profit. I don't mind if you duplicate my creativity to pass on to family members or friends as gifts or Occasions cards; but, PLEASE be considerate of others creativity! Thank you!
If you are interested in purchasing Stampin' Up products, you can order from me on-line at www.stampinup.com and please choose me, Lynn Gauthier, as your Demonstrator.
This is my first blog and it is still under construction. I have yet to receive my Watermark so the picture's are copyright Lynn A. Gauthier, 2015-2016 Stampin' Up.


I'm LOVING what you did as an alternate card my friend. SO MUCH FUN! Thanks for sharing.
ReplyDelete