It's a beautiful, sunny day outside today in Midland, Michigan. We had lots of rain over the weekend and this morning. It's nice to have all the humidity gone!!! The high temp for today is 74F with a low of 56F for tonight. The winds are NNW at 5 to 10mph.
My share for today is five Note Cards that I designed using the Color & Contour and Plentiful Plants Stamp Set, Scalloped Contours and Perennial Petals Dies, the 2021-2023 In Color Shimmer Vellum, five embossing folders and more. Let's take a look:
If you are not a reader of blogs and just like the pictures, (like someone I know), just Scroll Down through my Blog. 😊😊😊
My Card Base is Fresh Freesia Cardstock cut to measure 5" x 7" and scored at 3-1/2" for a Note Card.
I trimmed out a Panel of Evening Evergreen to measure 3" x 4-1/4" for my Card Front Panel.
I trimmed out a Panel Fresh Freesia Shimmer Vellum to measure 2-3/4" x 4" and embossed it with the Checks and Dots (there are two folders; this is the Checks) Embossing Folder. (I used the negative Vellum leftover piece on the inside of my Note Card.)
I adhered the Vellum Panel to the Card Front Panel with strategically placed Mono Multi Purpose Glue (where you would not be able to see the glue behind the Vellum).
I cut a length of Gold 3/8" Fine Art Ribbon, wrapped it around my Panel and adhered it 1" up from the bottom and secured each end of the Ribbon in back with both Mono Multi Purpose Glue and Tape.
Using the Perennial Petals Dies, I die cut out the Leaf Stems from Evening Evergreen Cardstock and adhered it to the Vellum with Mono Multi Purpose Glue. (See Below how I stamped and die cut this Flower.)
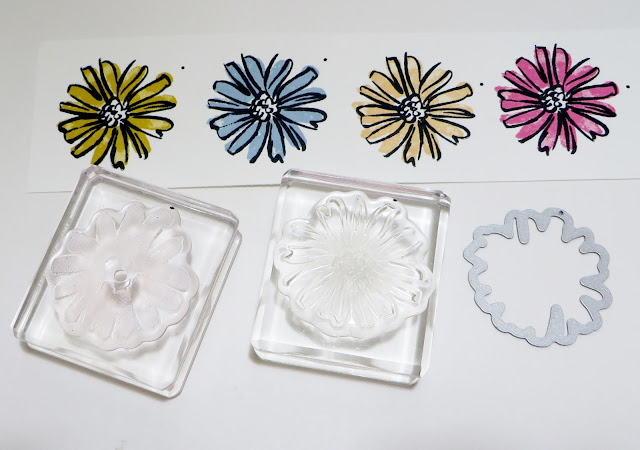
This technique is 'old hat'; but, it will benefit those who are new to stamping and make it much easier to stamp and die cut their Color & Contour Flowers.
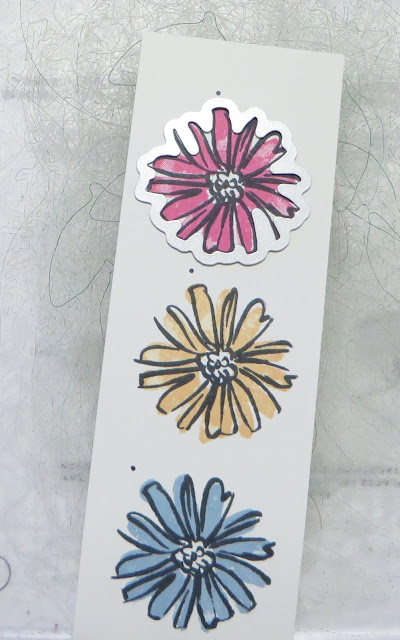
To start out, I normally pick out an 'odd ball' petal on the Flower Stamp and place a black mark with a black felt pen just above that petal on the edge of the Stamp itself.
I also line up the coordinating Die and place a black mark on the Die where that 'odd ball' petal is located. This just makes it so much easier and quicker to stamp and line up your die to die cut out the Flowers.
I adhered the Flower to my Card with Stampin' Dimensionals.
I fussy cut out the Flower Bud and adhered it to my Card with Mono Multi Purpose Glue.
I cut another length of Ribbon, tied it into a knot on one end, trimmed the other end upward and adhered it to my Card with Mono Multi Purpose Glue. (I put a blob of Glue onto the Knot and let it set up some before adhering it under the Flower.)
Using my Stampin' Write Marker in Fresh Freesia, I colored my Basic Jewel Pearls with Fresh Freesia, let them dry and then adhered them to my Flower and Cards.
For the inside of my Card:
I trimmed out a Panel of Thick Whisper White Cardstock to measure 2-11/16 x 3-15/16".
Using the Plentiful Plants Stamp Set, I masked my stamp and only stamped 'A Little Note' in Memento Black Ink onto the top of the Panel.
I adhered the negative Vellum die cut to the Whisper White Panel with tiny spots of Mono Multi Purpose Glue.
Using the Strawberry Builder Punch, I punched out one of the Flowers from the Fresh Freesia Shimmer Vellum and adhered it to the Panel with a small dot of Mono Multi Purpose Glue in the back of the center of the Flower.
Using the Turtle Punch, I punched the Medium Dot from Soft Succulent Cardstock and adhered it to the Center of the Flower.
I adhered the Panel to the inside of my Card with Mono Multi Purpose Glue.
Now, onto my other four Note Cards:
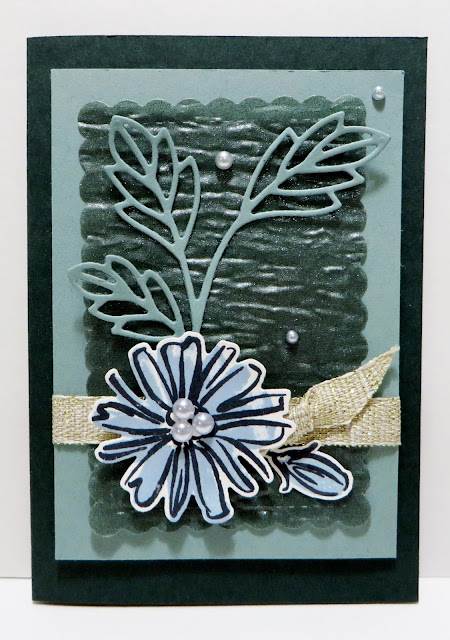
My Card Base is Evening Evergreen Cardstock.
My Card Front Panel is Soft Succulent Cardstock.
The Shimmer Vellum is Evening Evergreen embossed with the 'Bark' Embossing Folder.
The Leaf Stem is die cut from Soft Succulent Cardstock.
The Flower and Bud is stamped in Seaside Spray Ink.
I colored the Pearls with my Seaside Spray Stampin' Write Marker.
The Small Flower is Evening Evergreen Shimmer Vellum.
The center of the Flower is Soft Succulent Cardstock.
My Card Base is Pale Papaya Cardstock.
My Card Front Panel is Evening Evergreen Cardstock.
The Shimmer Vellum is Pale Papaya embossed with the Meadow Moments Embossing Folder.
The Leaf Stem is die cut from Evening Evergreen Cardstock.
The Flower and Bud is stamped in Pale Papaya Ink.
I colored the Pearls with my Pale Papaya Stampin' Write Marker.
Somehow, I missed taking a picture of the inside of this Card; but,..........
The Small Flower is Pale Papaya Shimmer Vellum.
The center of the Flower is Evening Evergreen Cardstock.
My Card Base is Soft Succulent Cardstock.
My Card Front Panel is Evening Evergreen Cardstock.
The Shimmer Vellum is Soft Succulent embossed with the Painted Texture Embossing Folder.
The Leaf Stem is die cut from Evening Evergreen Cardstock.
The Flower and Bud is stamped in Bumblebee Ink.
I colored the Pearls with my Bumblebee Stampin' Write Marker.
The Small Flower is Soft Succulent Shimmer Vellum.
The center of the Flower is Evening Evergreen Cardstock.
My Card Base is Polished Pink Cardstock.
My Card Front Panel is Evening Evergreen Cardstock.
The Shimmer Vellum is Polished Pink embossed with the Checks & Dots (this is the Dots) Embossing Folder.
The Leaf Stem is die cut from Evening Evergreen Cardstock.
The Flower and Bud is stamped in Polished Ink.
I colored the Pearls with my Bumblebee Stampin' Write Marker.
The Small Flower is Polished Pink Shimmer Vellum.
The center of the Flower is Evening Evergreen Cardstock.
Phew, that was a lot!!!
Thanks so much again to all my Blog Reader's for visiting my Blog!!! You're AWESOME and you've really made me feel special!!!I also want to thank all the Paper Pumpkin Subscribers for visiting my Blog. I get so many blog readers that visit my blog to see my Alternate Paper Pumpkin Cards and Projects.
Make something Cute and Brilliant today!!!
Tell someone you LOVE them and/or give someone an AIR HUG today!!!
Have a Blessed Day!!!
Please give credit where credit is due.
If you have questions or need information about any of my Cards or Projects, you can contact me at my e-mail address below.
If I can help in any way, please let me know by e-mail dodge3670 at aol dot com. I will try to respond within the next 1-3 days of your e-mail.
Wishing you all a Sunny Day!!!
Blessings
Lynn
2021-2022 Annual Catalog
Sales Period:
May 4, 2021 – May 2, 2022
Mini Occasions Catalog! starts 1-5-2021
JUNE Paper Pumpkin
The Adventure Begins

Life is full of big adventures that are best experienced together! This month’s The Adventure Begins Paper Pumpkin Kit helps you celebrate those exciting new chapters in the most creative of ways with enough supplies to create twelve motivating cards—plus coordinating envelopes—all featuring the exciting colors of nature.
Like the still moments before a great adventure, the kit’s designs contain a quiet energy that hint at all the grand possibilities of what is yet to come. Share this kit with your family and friends about to embark on a new journey and make connections while you explore and discover new levels of your creativity!
ABOUT THE KIT
Details
- Contains enough supplies to create twelve cards and coordinating envelopes.
- Card size: 4-1/4” x 5-1/2” (10.8 x 14cm)
- Envelope size: 4-1/2” x 5-3/4” (11.4 x 14.6 cm)
- Comes with a Stampin’ Spot plus an exclusive Stamp Set.
- Includes inspirational sentiments and adventure-themed imagery featuring these nature-inspired coordinating colors: Basic Black, Basic White, Bermuda Bay, Crushed Curry, Early Espresso, Flirty Flamingo, Garden Green, Granny Apple Green, Mango Melody, Night of Navy.
Note: Supplies may be limited toward the end of the subscription period.
If you would like to order Paper Pumpkin, please click on the link below and please choose me, Lynn Gauthier, as your Demonstrator.
HEY CHICK & HEY BIRTHDAY CHICK BUNDLES
CUSTOMER SALES PERIOD
FEBRUARY 2–JUNE 30, 2021
ORDERING DEADLINES
- Phone: 30 June 2021; 6:50 PM (MT)
- Online: 30 June 2021; 11:50 PM (MT)
During Sale-A-Bration 2017, Stampin' Up! was blown away by how much Demonstrators and Customers loved the Hey Chick Stamp Set. So, Stampin' Up! decided to bring it back—along with coordinating dies and a completely new bundle created in the same style. These two bundles are only available for a limited time.
HEY CHICK BUNDLE 158627
Includes the Hey Chick Stamp Set and Chick Dies.
Available in French (158628)
$44.00 USD/$60.25 CAD
HEY BIRTHDAY CHICK BUNDLE 158631Includes the Hey Birthday Chick Stamp Set and Birthday Chick Dies. See details below.
Available in French (158632)
$43.00 USD/$59.25 CAD
If you would like to order Paper Pumpkin, please click on the link below and please choose me, Lynn Gauthier, as your Demonstrator.
Here's a link to SU's Clearance Rack:
If you are interested in purchasing Stampin' Up products, you can order from me on-line at www.stampinup.com and please choose me, Lynn Gauthier, as your Demonstrator.
Lynn Gauthier's Pinterest Boards
If you would like to visit my Pinterest Boards, Please click Here
STAMPIN’ CUT & EMBOSS MACHINES!!!
PLEASE GIVE CREDIT WHERE CREDIT IS DUE!


No comments:
Post a Comment