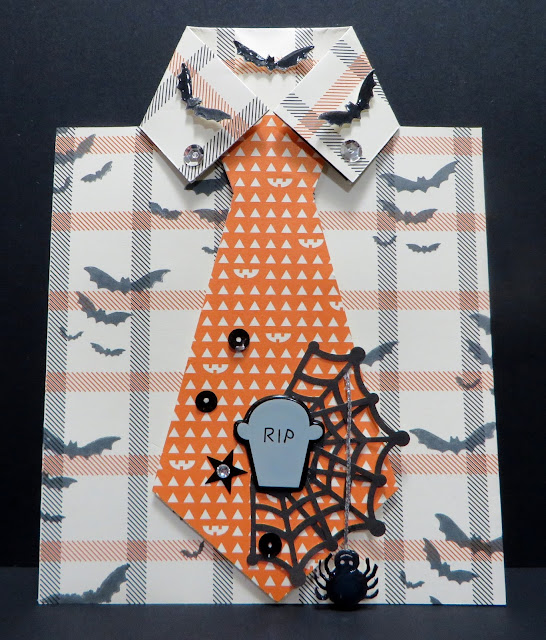
Here's a closeup of the tie!
Here's a closeup of the Shirt Collar:
Here's the instructions to make the Shirt card:
I started with a plaid piece of the new Stampin' Up Happy Haunting Designer Series Paper in the new 2015 Holiday Catalog. I LOVE those little Pumpkin Face smiles in the DSP. The paper was cut to 4 1/4" x 11" and scored at 5 1/2".
Place the folded edge of card into the Stampin' Trimmer. Start with the cutting blade at the bottom 4 1/4" mark and cut up to the 3" mark on the ruler. Lift the blade up and move it to the 1 1/4" mark and cut up and off the top edge of the card. These small cut flaps will be the collar of the shirt. Score in between cut lines and fold.
Put a small amount of snail tape in between the collar pieces on each side. Fold the 2 collar pieces down and on an angle as shown in picture above. Put a Stampin' Dimensional under each collar piece to hold the points down.
The Bat stamp from SU's new Witches' Night Stamp Set was stamped all over the front of the shirt to make my own version of DSP. I fussy cut 3 of the largest Bat's and shined them up with some Stampin' Up Crystal Effects. LOVE this stuff! I rolled up small glue dots and attached the Bat's to the collar when they were dry. I also added two silver sequins for the collar buttons.
I drew out my own Tie and trimmed it out with my Stampin' Trimmer and adhered it with Stampin' Dimensionals on to my card.
I added 4 fussy cut pieces of SU's new Spider Web Doilies. These are so COOL! The front of them is black and the back is white. So, you can color the white side with any color ink that you want.
The spider is from the new Stampin' Up Howl-o-ween Treat Stamp Set. I fussy cut him out and shined him up with Crystal Effects also.
I adhered a short piece of the new SU Silver Cording for the Spiders Web and attached the Spider to the end with Stampin' Dimensionals.
I took 3 black sequins and 1 black star from my SU Metallics Sequin Assortment and glued them on randomly to the tie.
The RIP Tombstone brad is a non-Stampin' Up embellishment. I've had these for years and was glad I got the chance to use them.
Hope you enjoyed my blog post today!
If you are
interested in purchasing Stampin' Up products, you can order from me
on-line at www.stampinup.com and please choose me, Lynn Gauthier, as
your Demonstrator
This is my first blog and it is still under construction. I have yet to receive my Watermark so the picture's are copyright Lynn A. Gauthier, 2015 Stampin' Up.
The content in this blog is the sole responsibility of the site owner, an Independent Stampin' Up! Demonstrator. .
This is my first blog and it is still under construction. I have yet to receive my Watermark so the picture's are copyright Lynn A. Gauthier, 2015 Stampin' Up.
The content in this blog is the sole responsibility of the site owner, an Independent Stampin' Up! Demonstrator. .


You are SO SWEET Lynn to provide us with these directions. THANK YOU....That was A LOT OF WORK. You shirt card just couldn't be any cutier. LOVE how you used the bat stamp to create your own pattern for the shirt. AWESOME card my friend.
ReplyDelete