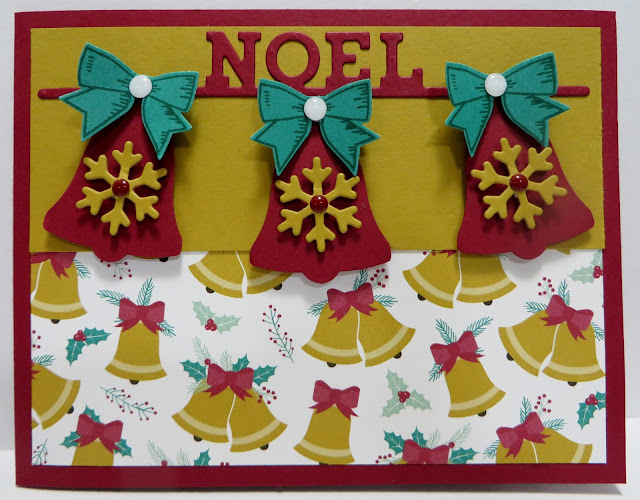
My share for today is a Christmas card that I designed using Stampin' Up's Holly Berry Happiness and Seasonal Bells Stamp Sets, Holly Berry Builder and Bell Punches, Presents & Pinecones Designer Series Paper and Christmas Stockings Thinlits Dies and Bunch of Banners and Layering Ovals Framelits Dies.
Let's take a look:
My card base is Cherry Cobbler Cardstock cut at 4-1/4" X 11" and scored and folded at 5-1/2" for a side opening card. I haven't made this type of card in a long time.
My top card front panel is Delightful Dijon Cardstock cut at 2" x 5-1/8" and adhered to my card base with Mono Multi-Purpose Glue.
My bottom card front panel is the Bell piece from Stampin' Up's Presents & Pinecones Designer Series Paper cut at 1-7/8" x 5-1/8" and adhered to my card base with Mono Multi-Purpose Glue.
Using SU's Christmas Stockings Thinlits Dies, I die cut the Noel image from Cherry Cobbler Cardstock and adhered it to the top of my card with Mono Multi-Purpose Glue.
Using SU's Bell Punch, I punched 3 Bells from Cherry Cobbler Cardstock and adhered them to the Noel image with Stampin' Dimensionals as shown in the picture above.
Again, using SU's Christmas Stockings Thinlits Dies, I die cut the Stocking with the Snowflake in the center 3 times from Delightful Dijon Cardstock. I adhered the Snowflakes to the center of each bell with a small piece of Stampin' Dimensionals. I'm using the 3 Stockings for another project.
Using SU's Holly Berry Happiness Stamp Set, I stamped the Bow image on Emerald Envy Cardstock 3 times, punched them out with SU's Bell Punch and then adhered them to the top of each Bell with a small piece of Stampin' Dimensionals.
For the inside of my card;
I die cut a Scalloped Oval from Emerald Envy Cardstock using SU's Layering Ovals Framelits Dies and adhered it to the inside of my card with Mono Multi-Purpose Glue.
Using SU's Seasonal Bells Stamp Set, I stamped my sentiment in Cherry Cobbler Ink on Whisper White Cardstock. I die cut the sentiment out using SU's Bunch of Banners Framelits Dies and adhered it to the top of my Oval with Mono Multi-Purpose Glue.
And, of course, as all of you know by now, I have to add my FAVE. I adhered 3 Cherry Cobbler Circle Enamel Shapes to the center of my Snowflakes and 3 White Perfect Accents to the center of each Bow.
Another quick and easy card with a lot of elegance!
I'm in LOVE with this color combination also and so very happy with the way my card turned out!
That's all I have for today. Thanks for stopping by my blog!
I
recently discovered that people are using my cards and/or projects,
duplicating them and entering them into challenges and using them for their own card classes. My cards and
projects are my own creations and are not to be used in challenges, blog hops, card classes or
sold at craft shows; etc., for profit. I don't mind if you duplicate my
creativity to pass on to family members or friends as gifts or Occasions
cards; but, PLEASE be considerate of others creativity! Thank you!
If you are
interested in purchasing Stampin' Up products, you can order from me
on-line at www.stampinup.com and please choose me, Lynn Gauthier, as
your Demonstrator.
This is my first blog and it is still under construction. I have yet to receive my Watermark so the picture's
are copyright Lynn A. Gauthier, 2015-2016 Stampin' Up.


I am TOTALLY in love with your Cherry Cobbler bells. But the real heart love is the darling snow flakes on the center of each bell....OHHHHHH!!!!
ReplyDelete