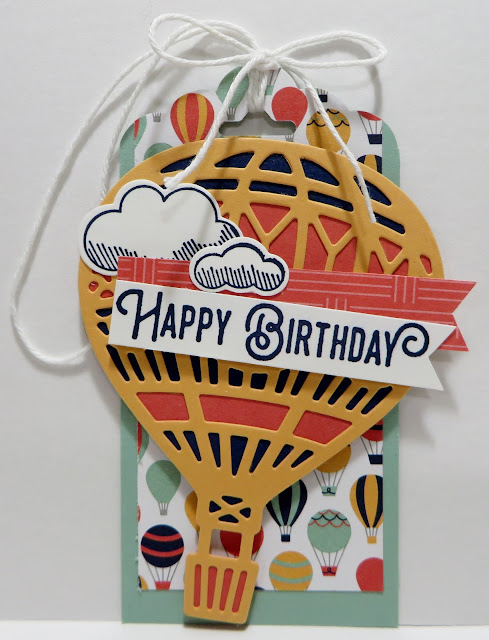
My share for today is 3 more of 12 Tags that I designed to go with the 12 Balloon Cards and Envelopes that are in my Embellished Free Sale-a-Bration Tin that I posted on my blog all last week. If you missed last and this weeks Free SAB Tin, Cards and Envelopes on my previous blog posts or want to see them again, you can click on the links below:
http://lynnslocker.blogspot.com/2017/02/stampin-up-carried-away-lift-me-up-up.html
http://lynnslocker.blogspot.com/2017/02/stampin-up-carried-away-lift-me-up-up_28.html
http://lynnslocker.blogspot.com/2017/03/stampin-up-carried-away-lift-me-up-up.html
http://lynnslocker.blogspot.com/2017/03/stampin-up-carried-away-lift-me-up-up_2.html
http://lynnslocker.blogspot.com/2017/03/stampin-up-carried-away-lift-me-up-up_3.html
http://lynnslocker.blogspot.com/2017/03/stampin-up-carried-away-lift-me-up-up_6.html
The Stampin' Up products that I used are the Free Sale-a-Bration Tin, the Free SAB Carried Away Designer Series Paper, the Lift Me Up Stamp Set, the Up and Away Thinlits Dies and the Triple Banner and the Scalloped Tag Topper Punches.
Here's a re-cap of the Tin first:
The free SAB Tins are so fun to embellish and I love how mine turned out! Way too cool! And, I have found so many uses for the Tins.
Stampin' Up provided us with a video tutorial on how to embellish the Tin and make 12 cards and envelopes to fit in the Tin. Thank you so much Stampin' Up!!!
And, as you can see in the picture above, there is plenty of room to include the 12 Tags that I designed.
Let's take a look at my next 3 Tags that I designed:
Aren't they just so bright and cheery! I just LOVE these Hot Air Balloons...so colorful!
I designed the Tags to match the Carried Away Designer Series Paper and the Lift Me Up Stamp Set Sentiments that was used in each of the 12 cards.
My Tag Bases are Mint Macaron Cardstock (to match the 3 Mint Macaron Cards) and are just a titch under 2" Wide so that they fit in the Scalloped Tag Topper Punch and 4" in Height.
I trimmed out the DSP to measure 1-3/4" Wide x 4" in Height.
I punched both the Tag Base and the DSP using SU's Scalloped Tag Topper Punch and adhered the DSP to the Tag Base with Mono Multi Purpose Glue.
Pictured above is a look at the card that matches the Tag.
I masked off the bottom portion (to Lift Your Spirits) of the Just A Note Stamp and stamped it on Whisper White Cardstock with Night of Navy Ink.
I stamped my Clouds in Night of Navy and Mint Macaron Ink and die cut them out using SU's Up and Away Thinlits dies.
I die cut the detailed Large Balloons in Night of Navy and Peekaboo Peach Cardstock. I also die cut the Balloon pieces in Peekaboo Peach, Watermelon Wonder and Night of Navy Cardstock.
I adhered the Balloon pieces to the back of the Large Balloon die cuts with Mono Multi Purpose Glue and adhered the Balloon to my Tag with Stampin' Dimensionals.
Pictured above is a look at the card that matches the Tag.
I trimmed out my Banners to measure 3/8" to 1/2" and around 2-1/4" to 2-3/8" long with the ends flagged (depending on the length of the Sentiment).
I adhered the Large Cloud to the Balloon with Mono Multi Purpose Glue.
I adhered the two Banners together with Mono Multi Purpose Glue and to the Balloon with Stampin' Dimensionals.
I adhered the Small Cloud to the Banners with Mono Multi Purpose Glue.
As you can see in the picture above, I masked off the (You Soar Above the Rest) and only stamped the Congratulations.
Pictured above is a look at the card that matches the Tag.
My Baker's Twine is either Night of Navy or Whisper White and is about 32" long and folded into 4 - 8" lengths. I took the two ends that are folded and thread them through the Scalloped Tag Notch and brought the other ends through and tightened the twine up around the Notch. I then tied a bow with the two cut ends leaving the uncut end for the hanger. Hope that makes sense.
I hope you are enjoying this project as much as I am!!!
That's all I have for today. Thanks for stopping by my blog!
If you would like to become a Paper Pumpkin Subscriber with me, Please click on the link below to sign up.
https://www.paperpumpkin.com/en-us/sign-up/?demoid=2124949
If you would like to visit my Pinterest Boards, Please click on the link below:
https://www.pinterest.com/dodge3670/https://www.pinterest.com/dodge3670/
PLEASE GIVE CREDIT WHERE CREDIT IS DUE!
I recently discovered that people are using my cards and/or projects, duplicating them and entering them into challenges, using them for their own card classes and (using them on their blogs as their own creations) - Please give credit where credit is due. My cards and projects are my own creations and are not to be used in challenges, blog hops, card classes or sold at craft shows; etc., for profit. I don't mind if you duplicate my creativity to pass on to family members or friends as gifts or Occasions cards; but, PLEASE be considerate of others creativity! Thank you!


No comments:
Post a Comment