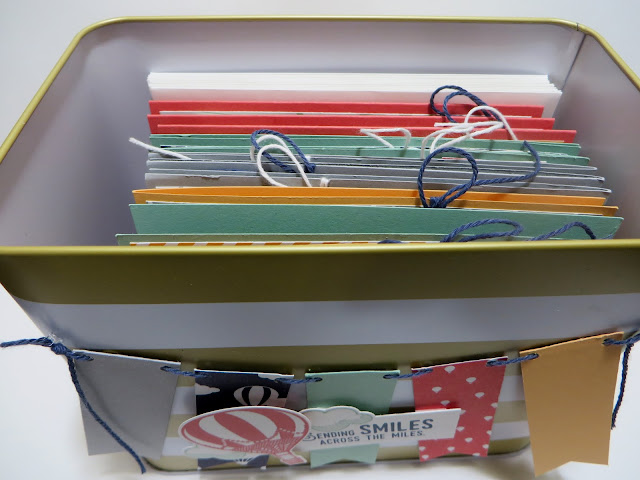
My share for today is 3 more of the 12 cards that are in my Embellished Free Sale-a-Bration Tin that I posted on my blog on Monday. If you missed this weeks Free SAB Tin and cards on my previous blog posts or want to see it again, you can click on the links below:
http://lynnslocker.blogspot.com/2017/02/stampin-up-carried-away-lift-me-up-up.html
http://lynnslocker.blogspot.com/2017/02/stampin-up-carried-away-lift-me-up-up_28.html
The Stampin' Up products that I used are the Free Sale-a-Bration Tin, the Free SAB Carried Away Designer Series Paper, the Lift Me Up Stamp Set, the Up and Away Thinlits Dies and the Triple Banner Punch.
Let's take a look:
The free SAB Tins are so fun to embellish and I love how mine turned out! Way too cool! And, I have found so many uses for the Tins.
I LOVE the Lift Me Up Stamp Set as it has so many great Sentiments and the Free SAB Carried Away Designer Series Paper as it has so many pretty designs.
Stampin' Up provided us with a video tutorial on how to embellish the Tin and make 12 cards and envelopes to fit in the Tin. Thank you so much Stampin' Up!!!
For these 3 Cards, my Card Bases are Mint Macaron Cardstock cut at 5-1/2" x 8-1/2" and scored and folded at 4-1/4". (These cards have a side opening which different from the previous 6 cards that have a top opening.)
My Card Fronts are from the Free SAB Carried Away Designer Series Paper cut at
4" x 5-1/4" and adhered to my Card Bases with Mono Multi Purpose Glue.
My Second Card Front Balloon Panel is Whisper White Cardstock cut at 3" x 3-1/2"; but, turned long wise.
Using SU's Lift Me Up Stamp Set, I stamped the Large Balloon in Watermelon Wonder Ink and the Small Balloon in Peekaboo Peach Ink. The 3 clouds are stamped in Mint Macaron Ink. (The Balloons are stamped in reverse of the previous 6 cards and the clouds are stamped in different areas.)
I wrapped about 34" of White or Navy Baker's Twine around my Card Fronts on the right side and tied it in a Bow.
I then adhered my Second Card Front Balloon Panel to my Card with Stampin' Dimensionals.
For my Sentiments:
I trimmed out my Sentiment Banners from Whisper White Cardstock to measure 1" x 3-3/4" and flagged my ends with SU's Triple Banner Punch. (I did not insert my Banner all the way into the punch as I didn't want to cut that much off of the Banner. If you turn your punch up-side-down, you can see how much you are punching off. I only inserted the Banner to the gray edge of the underneath opening of the punch.)
Using SU's Lift Me Up Stamp Set, I stamped my Sentiments on my Whisper White Banners with Night of Navy Ink.
For my DSP Banners:
I trimmed out my Free SAB Carried Away Designer Series Paper to measure 3/4" x 4" and Flagged the ends as I did for the Sentiment Banners keeping them longer as shown in the picture above.
I adhered the two Banners together and to my Card with Stampin' Dimensionals. (Make sure to adhere your Dimensionals towards the bottom of your Banners.)
These are so fun to make and I really had a production line going.
I also LOVE how all of Stampin' Up's products color coordinate. No more looking for items to match the inks or papers in my cards.
Thank you so much, again, Stampin' Up for sharing the video tutorial with us! You're AWESOME!
That's all I have for today. Thanks for stopping by my blog!
If you would like to become a Paper Pumpkin Subscriber with me, Please click on the link below to sign up.
https://www.paperpumpkin.com/en-us/sign-up/?demoid=2124949
If you would like to visit my Pinterest Boards, Please click on the link below:
https://www.pinterest.com/dodge3670/https://www.pinterest.com/dodge3670/
PLEASE GIVE CREDIT WHERE CREDIT IS DUE!
I recently discovered that people are using my cards and/or projects, duplicating them and entering them into challenges, using them for their own card classes and (using them on their blogs as their own creations) - Please give credit where credit is due. My cards and projects are my own creations and are not to be used in challenges, blog hops, card classes or sold at craft shows; etc., for profit. I don't mind if you duplicate my creativity to pass on to family members or friends as gifts or Occasions cards; but, PLEASE be considerate of others creativity! Thank you!


Wow! Lynn, you're really rockin' this card set! Wonderful project. Thanks so much for sharing!
ReplyDeleteI'm LOVING how you tied the Baker's Twine to the RIGHT of these cards. LOVE that little change in twine placement.
ReplyDelete