I am also going to share some envelopes, gift tags and a gift tag box holder that I designed which revolves around the design of SU's class.
So, stay tuned to my blog the rest of this week to take advantage of all the cards, tags, box holders, pictures and instructions.
You've seen the cards and the card box holder now, so it's on to the tags that I designed which revolve around the design of SU's class.
Let's get started with the final tag in the series:

I made my tags 3" x 4" and angled the top corners.
And, Yay!!! I used my Washi Tape now that it is all organized and I can see it out in the open. (See my Washi Tape Organization blog post here ) - http://lynnslocker.blogspot.com/2016/02/stampin-up-washi-tape-organization.html . I used the Hello Honey with tiny white dots piece of SU's Botanical Gardens Designer Washi Tape and wrapped it around the bottom edge of my tag.
I used one of SU's Botanical Gardens Designer Series Paper, the Basic Black Large floral pattern and cut it at 3" x 3 3/8", adhered it to my tag using Mono Multi-Purpose Glue and trimmed off the excess paper hanging over the edges on the angles of my tag.
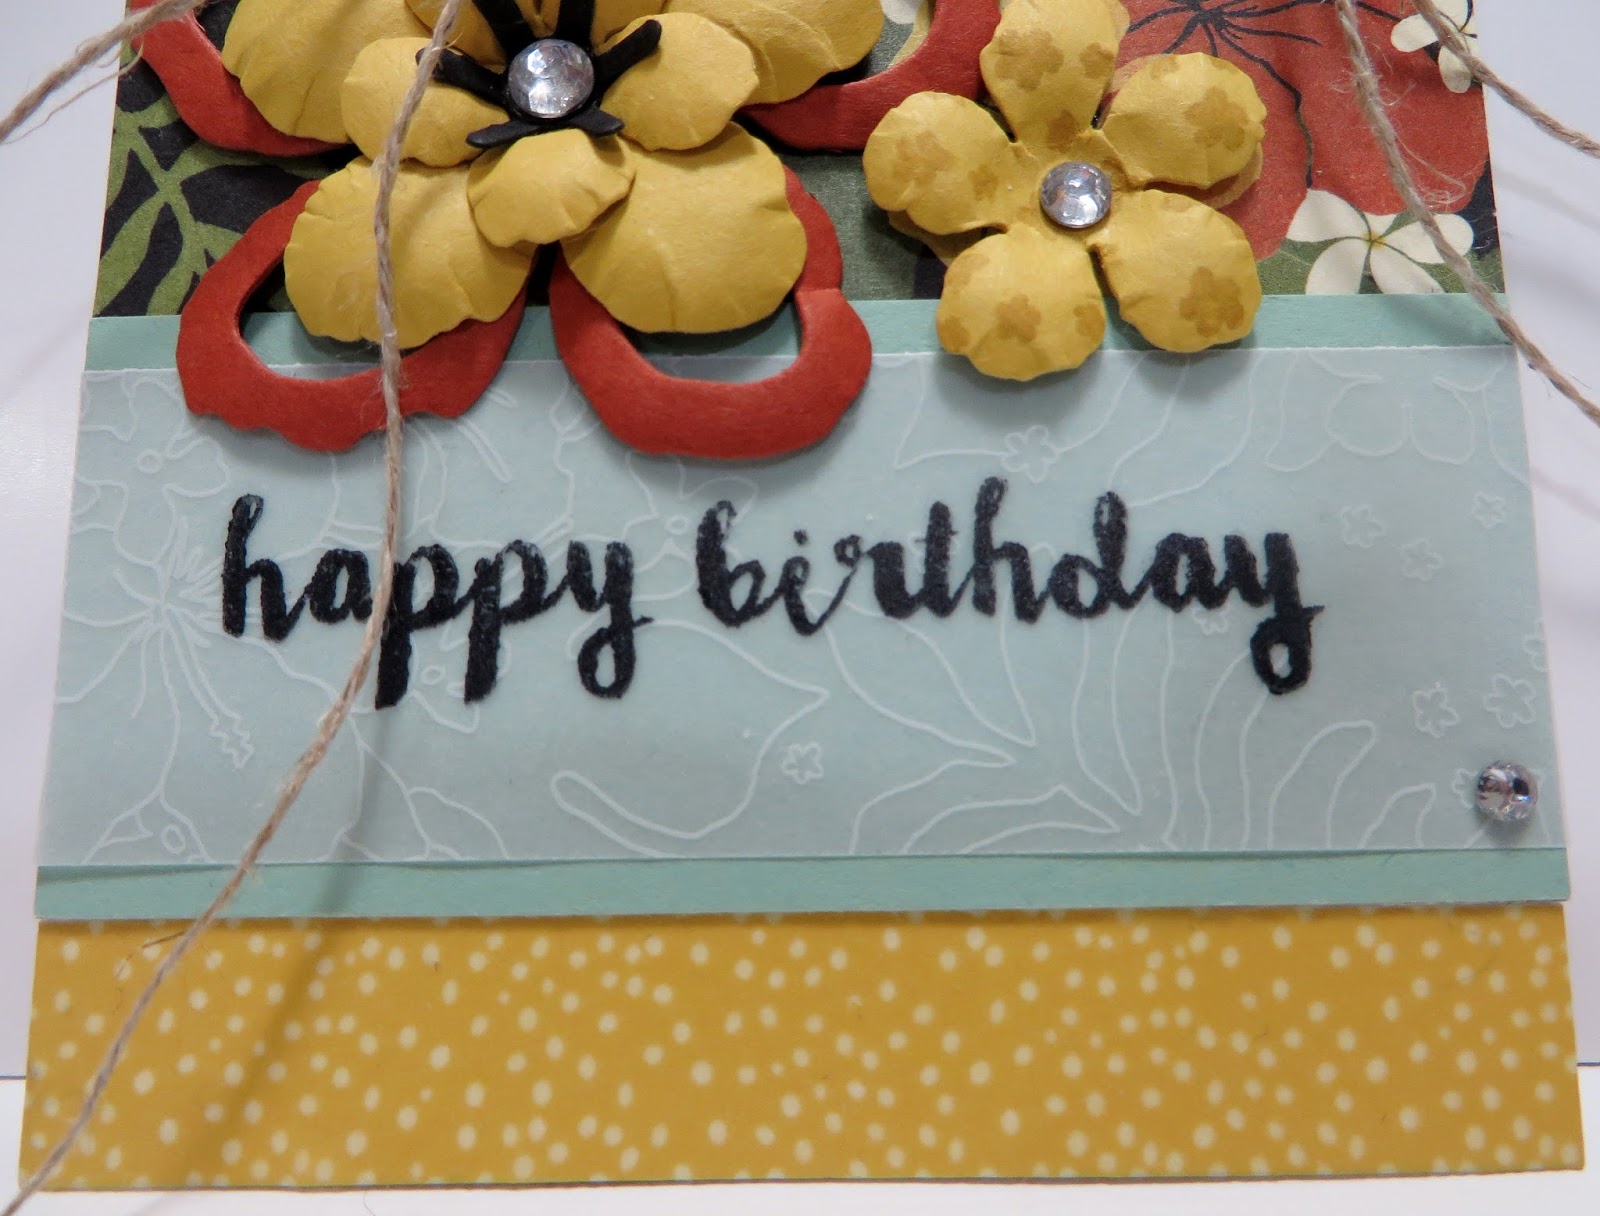
I cut a piece of SU's Mint Macaron Cardstock 1 1/4" x 3" and adhered it to my tag just above the Washi Tape.
I cut a piece of the multi-floral pattern from SU's Botanical Gardens Designer Vellum Stack at 1" x 3". I stamped the sentiment in SU Black StazOn Ink using the Happy Birthday stamp in SU's new monthly Paper Pumpkin Kit for February called Hello Sunshine. I then adhered the vellum centered over the Mint Macaron Cardstock using Mono-Multi Purpose Glue behind the letters of the sentiment only. (You don't want to see glue showing through your vellum).
I placed one of SU's Basic Jewel Rhinestones in the corner of the vellum and then added a tiny spot of glue behind the vellum under the rhinestone to make it a little more secure.

I die-cut one Large Flower using SU's Botanical Builder Framelits Die's from SU's Cajun Craze Cardstock.
I stamped the little flowers from SU's Botanical Blooms Stamp Set 3 times onto SU's Hello Honey Card Stock. I die-cut one Small and one Medium flower from SU's Hello Honey Cardstock and one Small flower from the flower stamped Hello Honey Card Stock. I used my Petal Roller Tool and gave some texture to my flowers by curling and cupping the flower petals.
Then I die cut the Spoke flower center from SU's Basic Black Cardstock. .
I removed the petals from the Large Cajun Craze flower. Using Mono Multi-Purpose Glue, I adhered the Small Hello Honey flower to the Medium Hello Honey flower and then to the Large Cajun Craze Flower without the petals. I added the spoke flower center using Mono Multi-Purpose Glue.
I adhered the two flowers to my tag using Mono Multi-Purpose Glue.
I added SU's Basic Jewel Rhinestones to the centers of my flowers.
Gorgeous!!!

(I'm using a previous blog post picture above as I didn't take a picture of each individual tag to show the hanger portion).
I die-cut a small Flower from SU's Cajun Craze Cardstock, rolled and cupped the petals and adhered it centered to the top of my tag using Mono Multi-Purpose Glue.
I punched a hole for my hanger at the top of my tag and through the center of the Flower using my SU 1/8" Handheld Punch.
I took a short piece of SU's Linen Thread and tied it into a loop. I took a very long double piece of the Linen Thread, threaded it through the short piece of Linen Thread and through the hole in the tag and tied it off into a double bow.

I just LOVE how my tags turned out and coincide with SU's Botanicals for You and Botanical Gardens Designer Vellum Stack Card Class by Stampin' Up. The vellum is so pretty with the Mint Macaron Cardstock showing through.
Thanks for visiting. Come back Monday where I'll share the tag box/holder that I designed with you.
Have a great day!
I recently discovered that people are using my cards and/or projects, duplicating them and entering them into challenges. My cards and projects are my own creations and are not to be used in challenges or sold at craft shows; etc., for profit. I don't mind if you duplicate my creativity to pass on to family members or friends as gifts or Occasions cards; but, Please be considerate of others creativity! Thank you!
If you are interested in purchasing Stampin' Up products, you can order from me on-line at www.stampinup.com and please choose me, Lynn Gauthier, as your Demonstrator.
This is my first blog and it is still under construction. I have yet to receive my Watermark so the picture's are copyright Lynn A. Gauthier, 2015-2016 Stampin' Up.
This tag is FABULOUS Lynn. Is there anything you can't do with this set?
ReplyDelete