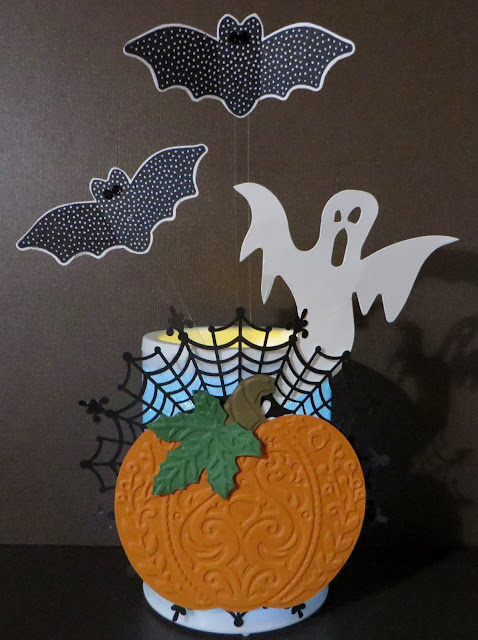
Hope everyone had a great weekend! I got to do a little shopping and found these Color-Changing LED Candle Lights and thought they would be really cool to embellish. I got carried away and made three and I could have kept going without a problem! Let's get started with the first one:
Now isn't that just stinkin' cute! It is really hard to capture the lights in a picture and the picture really does not do it justice. I could watch the color change in the candle forever; but, they only last 60 hours.
The ghost and pumpkin with leaf are Tim Holtz dies and embossing folder. The rest of the embellishments are from Stampin' Up.
The two bats were stamped using Stampin' Up's Cheer All Year Stamp Set and fussy cut. I then adhered them to skinny pieces of SU's Window Sheets so they look like they are flying in the air. I colored two SU Basic Jewel Rhinestones with a black Sharpie marker and adhered them to the bats for eyes.
Notice the black spider web doily from Stampin' Up. The doilies have been a great hit with Customers and have gone into back order several times now.
Now that's some awesome layering of snowflakes. The snowflake on the candle is from a retired Stampin' Up kit and I had a couple left.
The two snowflakes suspended on pieces of SU's Window Sheets are from SU's Flurry of Wishes Stamp Set and punched out with SU's Snow Flurry Punch.
I embellished the snowflakes with SU's Basic Jewel Rhinestones.
Notice how I used the back side of SU's Black Spider Web Doily. It's white on the reverse side.
Ahhhhhh...I LOVE butterflies! And, I don't care what time of year it is!
The butterfly on the candle and the butterfly on the upper left are die cut from SU's Bold Buttery Framelits and Butterflies Thinlits Dies. I LOVE these dies!!
The butterfly on the upper right is punched from SU's Elegant Butterfly and Bitty Butterfly punches.
I pulled a thread from a piece of SU's 1 1/4" Burlap Ribbon for the butterflies antenna and embellished them with SU's Basic Jewel Rhinestones.
The two leaves on the candle behind the butterfly were die cut from SU's new White Corrugated Paper using SU's Ovals Collection Framelits. I sponged them with SU's Pear Pizzazz Ink and adhered them with SU's Fast Fuse.
Notice the SU Spider Web Doily. I sponged the white side with SU's Pear Pizzazz Ink.
All the embellishments on the candles were attached to a 1/2" belly band on each candle.
I may be missing in action for a few days in the next couple weeks. We are doing some remodeling upstairs and I have a lot of staining to do! Hope you have better plans than me as I really don't enjoy staining.
I sure hope you enjoyed my project today and thanks for stopping by my blog!!
If you are
interested in purchasing Stampin' Up products, you can order from me
on-line at www.stampinup.com and please choose me, Lynn Gauthier, as
your Demonstrator.
This is my first blog and it is still under construction. I have yet to receive my Watermark so the picture's
are copyright Lynn A. Gauthier, 2015 Stampin' Up.
The content in this blog is the sole responsibility of the site owner, an Independent Stampin' Up! Demonstrator.


What a cute idea, Lynn! I love the Christmas one! I can see one for a birthday too!! You're so clever!
ReplyDeleteI am SO BLESSED to have a super great friend like YOU Lynn. I received my three candles last week and LOVE LOVE LOVE them. Thank you so very much for making me one of each of these. They look AMAZING in my studio.
ReplyDelete