My share for today is another Hexagon Halloween Card with lots and lots of details. Let's take a look:

I'm really enjoying embellishing these little 2-7/8" x 3-3/8" Hexagon Cards. So many cool ideas and details!
For my Card Base, I trimmed out a panel of Basic Black Cardstock that measures 3-1/2" x 7" and scored and folded it at 3-1/2". Using Stampin' Up's Window Box Thinlits Dies, I traced the Hexagon Die with a White Signo Gel Pen onto the Cardstock with the edge of the die on the folded edge of the Cardstock. I then trimmed the Hexagon out on my SU Trimmer. SU's Trimmer worked perfect for cutting through the double thickness. 😊😊😊
Using SU's Layering Circles Framelits Dies, I die cut the 2-1/2" Scalloped Circle from the Pumpkin Pie Swirl pattern from SU's Spooky Night Designer Series Paper and one from Pumpkin Pie Cardstock. (The Pumpkin Pie Scalloped Circle is for the inside of my Card.) I adhered the Pumpkin Pie Swirl pattern Scalloped Circle to my Card Base with Mono Multi Purpose Glue.

Using SU's Sweet Home Stamp Set, I stamped my Door onto the White Barn Wood pattern paper from SU's Wood Textures DSP Stack in Crumb Cake Ink. I like how the marks in the Barn Wood pattern show through the Crumb Cake Ink as a little darker. 😊😊😊
I also stamped the 3 Line Stamp for my Cement Steps in Smoky Slate Ink onto Smoky Slate Cardstock.
Using SU's Layering Circles Framelits Dies, I die cut out the stamped Door with the 2-1/8" Circle die as shown in the picture above.
Using SU's coordinating Home Sweet Home Thinlits Dies, I die cut the Door (it only die cuts 3 sides and embosses the left side so the Door will open up). I also die cut out the Door Frame from the same White Barn Wood pattern and adhered it around the Door with Mono Multi Purpose Glue.
Using SU's Spooky Cat Stamp Set, I stamped the Owls' eye's only in Basic Black Archival Ink towards the bottom of the Door.
I adhered my Steps to the bottom of my Door Circle and trimmed the overhanging excess off with my Snips.
I adhered my Door Circle to the Scalloped Circle on my Card Base with Stampin' Dimensionals.
I colored two of SU's Basic Jewel Pearls (tiny ones) with a Black Marker, let them dry and adhered them to the Owls' eye's.
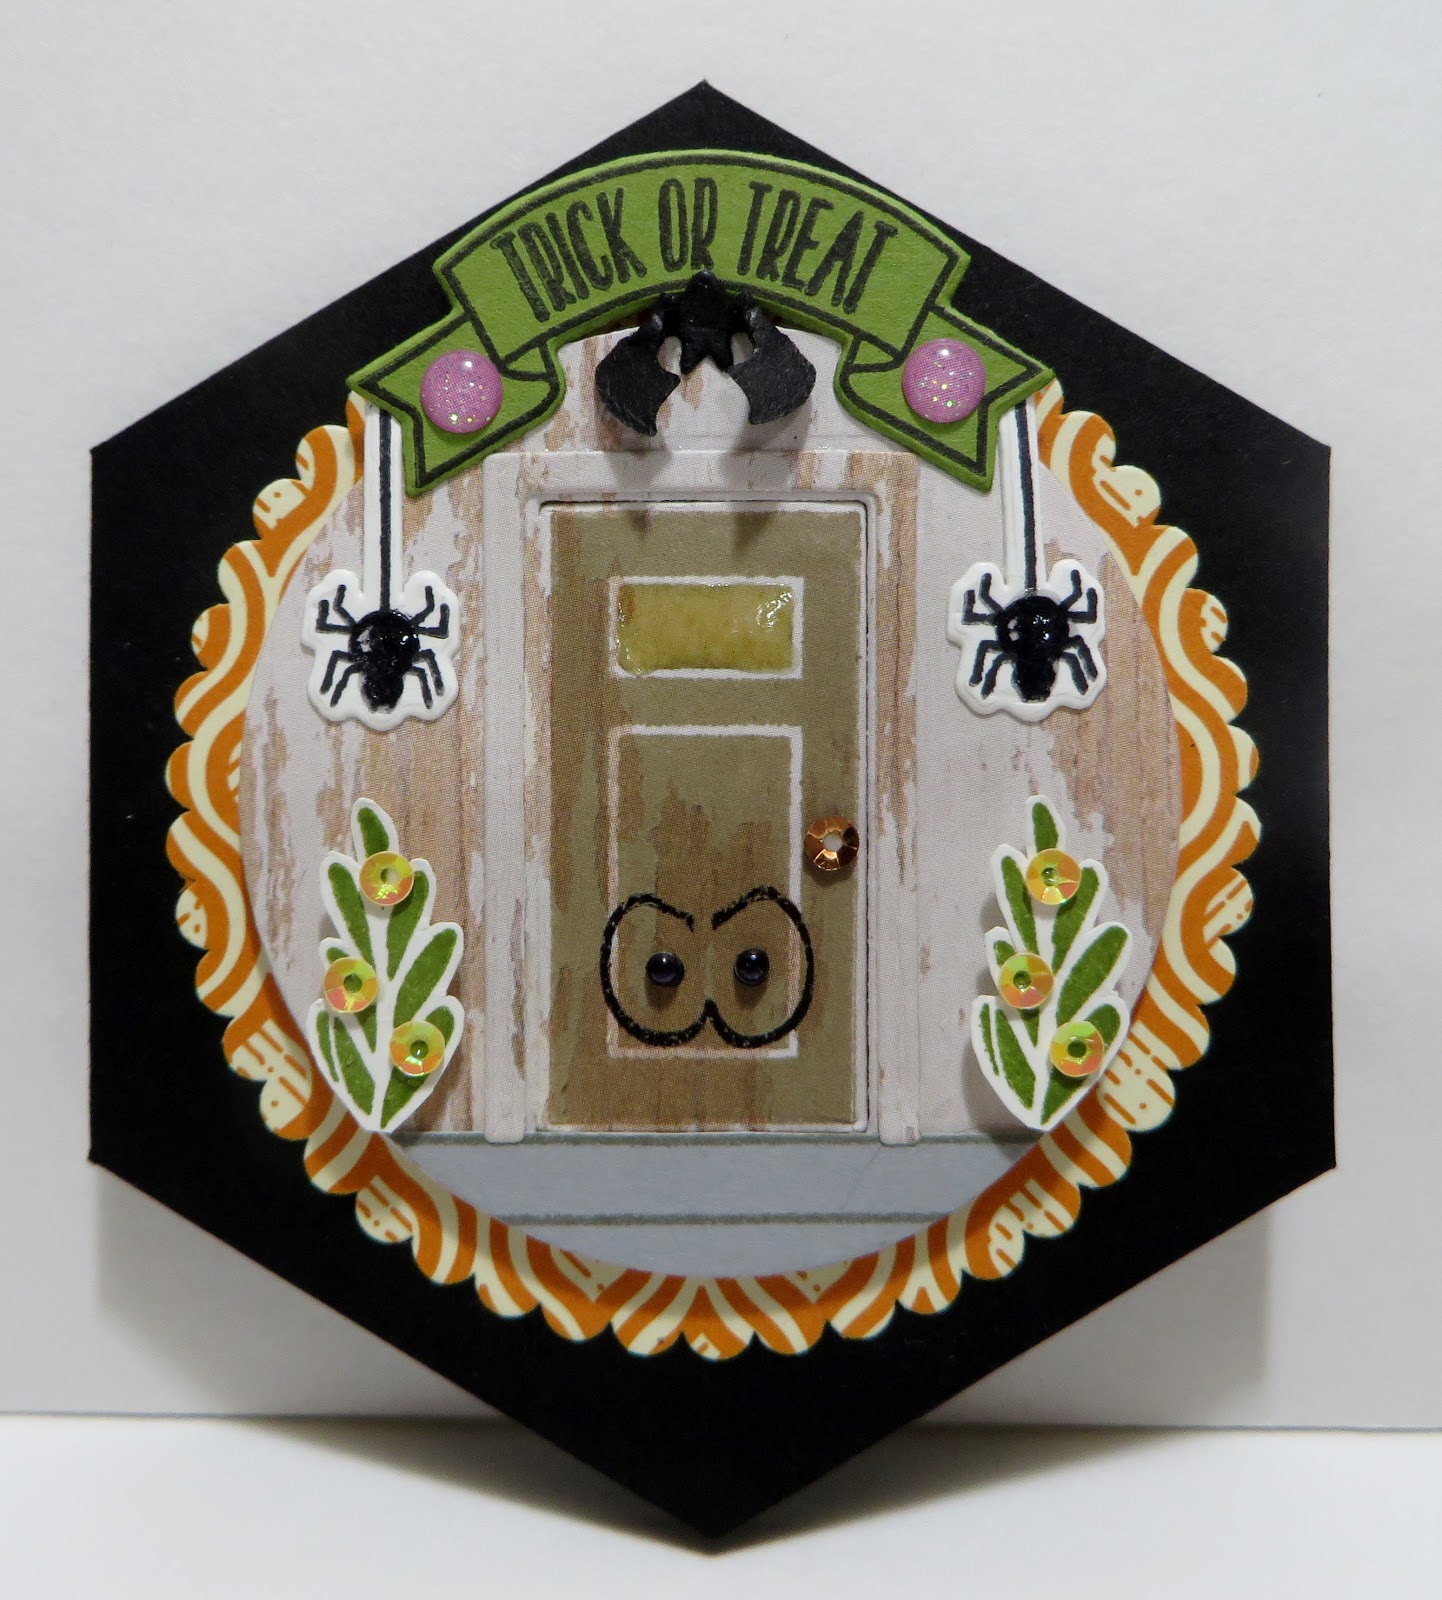
Using Sweet Home Stamp Set, I stamped the Banner Stamp and the Trick or Treat Stamp in Basic Black Archival Ink onto Old Olive Cardstock as shown in the picture above.
I stamped the Ghost Stamp in Basic Black Archival Ink onto Whisper White Cardstock.
Using Home Sweet Home Thinlits Dies, I die cut out the Banner and the Ghost and then die cut out two Bats from Basic Black Cardstock (one for the inside of my Card).
I adhered the ends of my Banner to the top of my Circle with Mono Multi Purpose Glue. I also put a small piece of a Stampin' Dimensional under the back of the top of the Banner.
I folded the Wings on the Bat downward and adhered the Bat hanging upside down above the Door with Mono Multi Purpose Glue on the Bat's body only leaving its folded Wings free of adhesive.
I adhered two of SU's Glitter Enamel Circle Shapes to each end of the Banner.

I opened up the Door and adhered the Ghost inside with Mono Multi Purpose Glue.

Using SU's Season to Sparkle Stamp Set, I stamped two Spiders in Basic Black Archival Ink onto Whisper White Cardstock.
Using SU's coordinating Chandelier Thinlits Dies, I die cut out the two Spiders.
I trimmed off maybe an 1/8" from the Web end of the Spiders and adhered them behind the Banners and on each side of the Door with Mono Multi Purpose Glue.

Using SU's Merry Cafe Stamp Set, I stamped two of the Solid Leaf Stem images in Old Olive Ink, fussy cut them out and adhered them to each side of the Door with tiny pieces of Stampin' Dimensionals for my Shrubs.
I adhered three tiny Pumpkin Pie Sequins from SU's Iridescent Sequin Assortment with Mono Multi Purpose Glue to my Shrubs as shown in the picture above.
I adhered one tiny Copper Sequin from SU's Metallic Sequin Assortment to my Door for my Door Knob.

I put some of SU's Fine Tip Glue Bottle adhesive onto both Spiders' bodies and the Door Window to give them a shine! I let that dry overnight.

Using SU's Creep It Reel Stamp Set, I stamped the BOO stamp in Basic Black Archival Ink onto the Pumpkin Pie Scalloped Circle and adhered it to the inside of my Card with Mono Multi Purpose Glue.

I adhered the second Bat above the BOO with Mono Multi Purpose Glue on the back of the Bat's body only leaving its Wings free of adhesive.
Phew...I hope I got it all...that was BIG fun!!! 😊😊😊
I still have some Stampin' Up Promotions to share with you today too!

The Paper Pumpkin team is
always tracking products that make you, our customers, happy and (no
surprise!) holiday kits are a huge favorite. Knowing this, they decided to
create a simple and fun holiday crafting experience that we, as Demonstrators,
can share with, you, our customers as the perfect way to streamline Christmas
preparation. Welcome to a Season of Style!
To give you more of what you love, during October and November Stampin'' Up! is offering Paper Pumpkin for two straight months of perfectly coordinated Christmas card making and gifting projects. For us demonstrators, two matching kits means two months of being able to offer the perfect solution to you for your holiday crafting needs.
For you, two coordinating kits means that 1) you will have everything you need to complete unique holiday cards and gifts, 2) you will have more creative options, and 3) you can get that handmade holiday touch without the fuss.
- The October and November kits coordinate but they also stand alone. You DO NOT need both kits to create a complete project.
- To receive October’s kit, you must subscribe at paperpumpkin.com by 11:50 PM (MT) on October 10.
- To receive November’s kit, you must subscribe at paperpumpkin.com by 11:50 PM (MT) on November 10.
Designer Series Paper Sale

Let’s
admit it: we all just love gorgeous Designer Series Paper and you are no different! By popular demand,
we are bringing back an incredible offer on Designer Series Paper. You can buy three packages of select Designer Series
Paper and get one FREE during October! This sale includes Designer
Series Paper from both the annual and holiday catalogs. And we’re even
including select Specialty and Designer Series Paper Stacks on sale! So
take advantage of this excellent opportunity to buy lots and lots of
pretty paper.
Designer Series Paper Sale Items
| Catalog | Item | Description | Price |
|---|---|---|---|
| Annual (p. 189) | 144180 | Just Add Color Specialty Designer Series Paper | $13.00 USD/$17.00 CAD |
| Annual (p. 189) | 144137 | Delightful Daisy Designer Series Paper | $11.00 USD/$14.50 CAD |
| Annual (p. 189) | 144118 | Birthday Memories Designer Series Paper | $11.00 USD/$14.50 CAD |
| Annual (p. 188) | 144111 | Be Merry Designer Series Paper | $11.00 USD/$14.50 CAD |
| Annual (p. 188) | 144163 | Pick a Pattern Designer Series Paper | $11.00 USD/$14.50 CAD |
| Annual (p. 188) | 144155 | Coffee Break Designer Series Paper | $11.00 USD/$14.50 CAD |
| Annual (p. 188) | 144185 | Naturally Eclectic Designer Series Paper | $11.00 USD/$14.50 CAD |
| Annual (p. 188) | 144110 | Whole Lot of Lovely Designer Series Paper | $11.00 USD/$14.50 CAD |
| Annual (p. 187) | 144168 | Petal Garden Designer Series Paper Stack | $10.00 USD/$12.50 CAD |
| Annual (p. 187) | 144193 | Color Theory Designer Series Paper Stack | $10.00 USD/$12.50 CAD |
| Annual (p. 187) | 144177 | Wood Textures Designer Series Paper Stack | $10.00 USD/$12.50 CAD |
| Holiday (p. 29) | 144629 | Christmas Around the World Designer Series Paper | $11.00 USD/$14.50 CAD |
| Holiday (p. 49) | 144613 | Painted Autumn Designer Series Paper | $11.00 USD/$14.50 CAD |
Stampin' Blends are Coming!

We, as Demonstrators, were able to order SU's Stampin' Blends markers yesterday. The Customer Launch should happen before the end of the year; but, we haven't been told a specific date yet! I can't wait to try them out!!!
Merry Patterns Host Promotion

Hosting a holiday catalog event is
always fun—and we’ve just sweetened the deal with our exciting Merry
Patterns Host Promotion. If you host a party
with $300 USD/$375 CAD in sales by October 31, you’ll earn the Merry Patterns Stamp Set FREE.
- Promotion period: September 1–October 31
- The Merry Patterns Stamp Set is exclusive to the host promotion and will not be available after October 31
- In order to qualify, the event merchandise total must reach $300 USD/$375 CAD (before shipping and handling)
- There is no limit to the number of times the Merry Patterns Stamp Set may be earned, but only one set can be redeemed per qualifying order
- Demonstrator, Customer, Workshop, and online orders qualify
- Orders must be closed by 11:50 PM (MT) on October 31
- The Merry Patterns Stamp Set is in addition to Stampin’ Rewards
- The Merry Patterns Stamp Set may not be exchanged for another stamp set
That's all I have for today. Thanks for stopping by my blog.
If you are interested in purchasing Stampin' Up products, you can order from me on-line at www.stampinup.com and please choose me, Lynn Gauthier, as your Demonstrator.
If you would like to visit my Pinterest Boards, Please click on the link below:
Here
If you would like to become a Paper Pumpkin Subscriber with me, Please click on the link below to sign up.
Here
PLEASE GIVE CREDIT WHERE CREDIT IS DUE!
I recently discovered that people are using my cards and/or projects, duplicating them and entering them into challenges, using them for their own card classes and (using them on their blogs as their own creations) - Please give credit where credit is due. My cards and projects are my own creations and are not to be used in challenges, blog hops, card classes or sold at craft shows; etc., for profit. I don't mind if you duplicate my creativity to pass on to family members or friends as gifts or Occasions cards; but, PLEASE be considerate of others creativity! Thank you!
No comments:
Post a Comment