It rained later in the day yesterday and about 3/4's of the snow is gone! It snowed very lightly this morning; but, it didn't stick to the ground. It's still in the 30's and cloudy out. Can someone please send me some warm weather and sunshine!!! =)
Today, I have 3 more Stampin' Up Pocketful of Cheer Paper Pumpkin Alternate Cards to share with you and a flower technique using SU's Envelope Punch Board that I learned a few years ago at a Stampin' Up Convention.
Let's take a look:
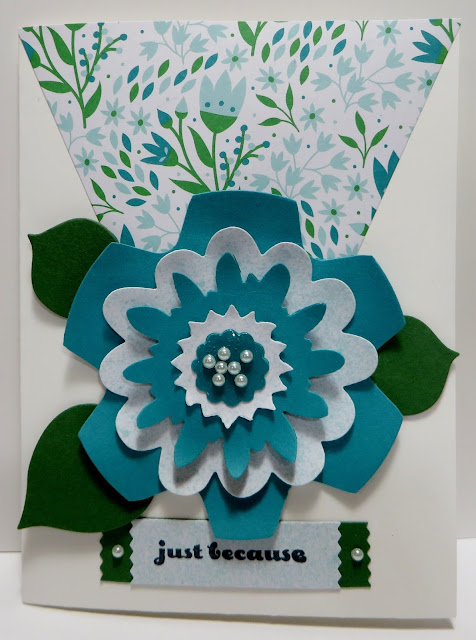
I LOVE the flower envelopes that come in the Pocketful of Cheer Paper Pumpkin Kit. They have such big, bright, cheery flowers printed on them. I cut off one of the flaps on the envelope and used it as a banner at the top of my card.
Using Stampin' Up's Flower
Fair Framelits, I die cut the 4 center sections of my flower from SU's
Bermuda Bay Cardstock and from the cards that come in the kit.
I die cut the leaves using SU's Leaflits Framelits with the small and medium leaf from SU's Garden Green Cardstock.
I stamped the sentiment from SU's And Many More Stamp Set on a piece of the card that comes in the kit in black Memento Ink and punched it out using SU's Washi Label Punch. Using SU's Garden Green Cardstock, I punched another Washi Label piece and elongated it. By this I mean, I cut a strip of cardstock that measured 5/8" wide by any desired length. I stuck one end in the punch, punched it, and then stuck the other end in the punch to the length I wanted and punched it again. I adhered the two Washi Label pieces together using Mono Multi-Purpose Glue and added a SU Basic Jewel Pearl to each end.
I used SU's Crystal Effects on my flower center and added some of SU's Basic Jewel Pearls to the center.
On this card, I die cut the flower pieces using Flower Fair Framelits, Bermuda Bay Cardstock and parts of the envelope.
I punched two of the leaf stems with SU's Bird Builder Punch and adhered them in the flower using Mono Multi-Purpose Glue.
I stamped my sentiment on SU's Soft Sky Cardstock and punched it out using SU's Word Window Punch.
I clipped one of the SU's Bow Clips on one of the flower petals and stuck the end of my sentiment in the clip.
I used a leftover piece of the 1/8" Green and Whited Striped Ribbon and tied it to the Bow Clip.
I made the Bermuda Bay flower petals on SU's Envelope Punch Board using the punch portion only on the board.
All you do is die cut or punch any size circles, place them in the punch board and punch. So, for the larger petal circle, I punched 5 times evenly spaced so that I have 5 petals. For the smaller petal circle, I punched 4 times evenly spaced so that I have 4 flower petals. You can see it best in the picture below.
I used the actual card that comes in the kit for my card base and added one of the flaps from the envelopes for my background.
I punched a piece of the
envelope using SU's Elegant Butterfly Punch and SU's Bitty
Butterfly Punch with Bermuda Bay Cardstock. I adhered both pieces
together and to the flower using SU's Stampin' Dimemsionals.
I pulled a thread from SU's 1 1/4" Burlap Ribbon and tied it around the butterfly for antennae. I also tied a small bow and adhered it to a flower petal using Mono Multi-Purpose Glue.
I randomly added some of the half green pearls that come in the kit on my bow, sentiment and flower petals.
That's all I have for today. Thanks so much for stopping by my blog!
I
recently discovered that people are using my cards and/or projects,
duplicating them and entering them into challenges. My cards and
projects are my own creations and are not to be used in challenges or
sold at craft shows; etc., for profit. I don't mind if you duplicate my
creativity to pass on to family members or friends as gifts or Occasions
cards; but, Please be considerate of others creativity! Thank you!
If you are
interested in purchasing Stampin' Up products, you can order from me
on-line at www.stampinup.com and please choose me, Lynn Gauthier, as
your Demonstrator.
This is my first blog and it is still under construction. I have yet to receive my Watermark so the picture's
are copyright Lynn A. Gauthier, 2015-2016 Stampin' Up.


LOVE how you used the shape of the envelope flap for the front of your card. OH SO FUN!
ReplyDelete