I'm starting to feel more like myself today. It seems that it takes me longer and longer to recover from all the surgeries this year. I also have company coming in tonight and staying the whole week so I hope I'm up to it all.
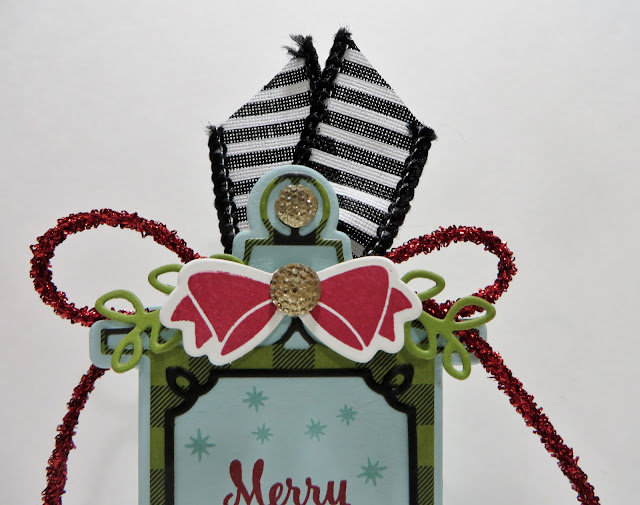
My share for today is a Mini Tic Tac Slider Project that I designed using Pining for Plaid Paper Pumpkin Kit, Seasonal Lantern Stamp Set and Lantern Builder Framelits Dies. Let's take a look:
I just LOVE how my Lanterns turned out! If I'm up to it tomorrow, I'll share my Lantern Candy Holders too!
I don't have a lot of time to go into details today; but, I'll share the basics with you.
For my Pool Party Cardstock Lantern:
I used Seasonal Lantern Stamp Set to stamp my Bow in Real Red Ink.
I used Lantern Builder Framelits Dies to cut my Lantern pieces.
Two Large Solid Lanterns from Pool Party Cardstock.
One Large Detailed Lantern from Pining for Plaid Paper Pumpkin Kit.
One Lantern Frame from Basic Black Cardstock.
Two Leaf Stems from Old Olive Cardstock.
The Merry Christmas Sentiment and Snowflakes are from Star of Light Stamp Set.
For my Real Red Cardstock Lantern:
I used Lantern Builder Framelits Dies to cut my Lantern pieces.
Two Large Solid Lanterns from Real Red Cardstock.
One Large Detailed Lantern from Old Olive Cardstock.
One Lantern Frame from Basic Black Cardstock.
One Solid Pine Bough from Old Olive Cardstock.
One Detailed Pine Bough from Pining for Plaid Paper Pumpkin Kit.
The Sentiment is from Father Christmas Stamp Stamp Set.
I used SU's 7/8" Striped Ribbon around the Tic Tac's and tied it off at the top with SU's Mini Tinsel Trim.
I adhered a small and large Faceted Gem to the top of the Lantern and on the Bow.
I colored 5 Small and 1 Medium Basic Jewel Rhinestones with my new Stampin' Blends in Cherry Cobbler and adhered the Medium one to the top of my Lantern and 5 Small to the Pine Bough.
For the Slider Box:
I trimmed out a piece of Cardstock to measure 3-1/4" x 4-3/4".
I scored the 3-1/4" side at 3/4".
I scored the 4-3/4" side at 1-1/2" - 2-1/4" - 3-3/4" - 4-1/2"
I trimmed my flaps up to the 3/4" score line and removed the bottom right skinny corner as shown in the picture above.
I adhered 1/8" Adhesive Tape as shown in the picture above.
I folded up my Slider Box and adhered it together.
The Slider Box is sandwiched between the two Large Lantern Die Cuts. You will want to do your stamping first before you assemble your Lantern.
I adhered everything together to make my Lanterns with Mono Multi Purpose Glue except I used a Mini Stampin' Dimensional to adhered the Pine Bough and the Bow.
These are going to make excellent Christmas gifts for family and friends. I know my post is quite brief so if you have any questions, please e-mail me at dodge3670 at AOL dot COM.
That's all I have for today. Thanks for stopping by my blog.
If you are interested in purchasing Stampin' Up products, you can order from me on-line at www.stampinup.com and please choose me, Lynn Gauthier, as your Demonstrator.
If you would like to visit my Pinterest Boards, Please click on the link below:
Here
If you would like to become a Paper Pumpkin Subscriber with me, Please click on the link below to sign up.
Here
PLEASE GIVE CREDIT WHERE CREDIT IS DUE!
I recently discovered that people are using my cards and/or projects, duplicating them and entering them into challenges, using them for their own card classes and (using them on their blogs as their own creations) - Please give credit where credit is due. My cards and projects are my own creations and are not to be used in challenges, blog hops, card classes or sold at craft shows; etc., for profit. I don't mind if you duplicate my creativity to pass on to family members or friends as gifts or Occasions cards; but, PLEASE be considerate of others creativity! Thank you!


These are so cute, Lynn! What a great idea. They're the perfect little gift to give! TFS
ReplyDeleteI hope you continue to get better & better! Enjoy your company.