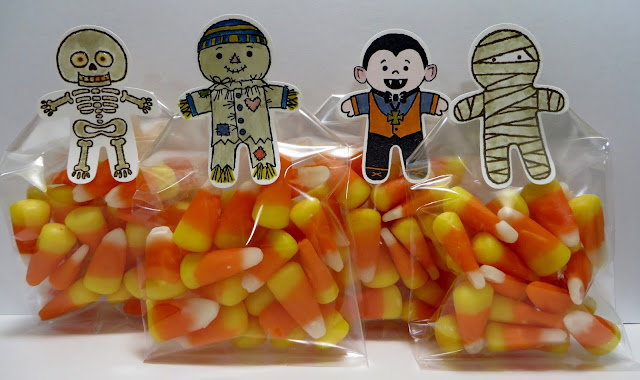
My share for today is a cute idea for Halloween Treat Bags. The Stampin' Up products that I used are Cookie Cutter Halloween Stamp Set, Cookie Cutter Builder Punch and some Clothespins that I purchased from the Clearance Rack. There are still some available in the Clearance Rack too!
Let's take a look:
I filled Stampin' Up's new 3" x 6" Gusseted Cellophane Bags (Food Safe) with Candy Corn, stapled them closed and clipped my little Cookie Cutter Halloween images on top. Candy Corn is one of my FAVE Halloween candies.
I stamped the Scarecrow in Basic Black Archival Ink onto Shimmery White Cardstock. The Shimmery White Cardstock is my FAVE to water color on.
Using my SU Aqua Painter, I water colored the Scarecrow with Sahara Sand Ink and then colored him in using my Stampin' Write Markers in Dapper Denim, Crushed Curry, Blushing Bride, Perfect Plum, Old Olive and Calypso Coral.
I stamped the Mummy in Soft Suede Ink.
Using my SU Blender Pen and Crumb Cake Ink, I moved the inks around to color the Mummy.
Mr. Skeleton just cracks me up no matter how many times I make him!
I stamped and colored Mr. Skeleton the same way as the Mummy and added Crystal Effects (Retired) to his eye's and teeth. Too funny!
For Vampire Boy, I stamped him in Basic Black Archival Ink and water colored his face and hands with Pink Pirouette Ink.
I colored in the rest of him with my Stampin' Write Markers in Basic Black, Pink Pirouette, Perfect Plum and Pumpkin Pie.
I used my Gold Wink of Stella Brush to color in his Cross.
Using Mono Multi-Purpose Glue, I adhered the Clothespins to the back of each image and let them dry.
You could even put magnets on the back of these guys and put them on your refrigerator for a cute Halloween decoration. Or, you could tuck them into any type of plant or flower arrangement. So many idea's!!!
This was a quick, easy and fun project to make. Kept me smilin' all the way through it!!!
That's all I have for today. Thanks for stopping by my blog!
I recently discovered that people are using my cards and/or projects, duplicating them and entering them into challenges and using them for their own card classes. My cards and projects are my own creations and are not to be used in challenges, blog hops, card classes or sold at craft shows; etc., for profit. I don't mind if you duplicate my creativity to pass on to family members or friends as gifts or Occasions cards; but, PLEASE be considerate of others creativity! Thank you!
If you are interested in purchasing Stampin' Up products, you can order from me on-line at www.stampinup.com and please choose me, Lynn Gauthier, as your Demonstrator.
This is my first blog and it is still under construction. I have yet to receive my Watermark so the picture's are copyright Lynn A. Gauthier, 2015-2016 Stampin' Up.


LOVE how you added a clothespins to the back of each little spooky fellow. OH SO CUTE LYNN!
ReplyDelete