Another cool, windy, gloomy start for today with a chance of sprinkles here and there! It's supposed to be this way all week and through the weekend.
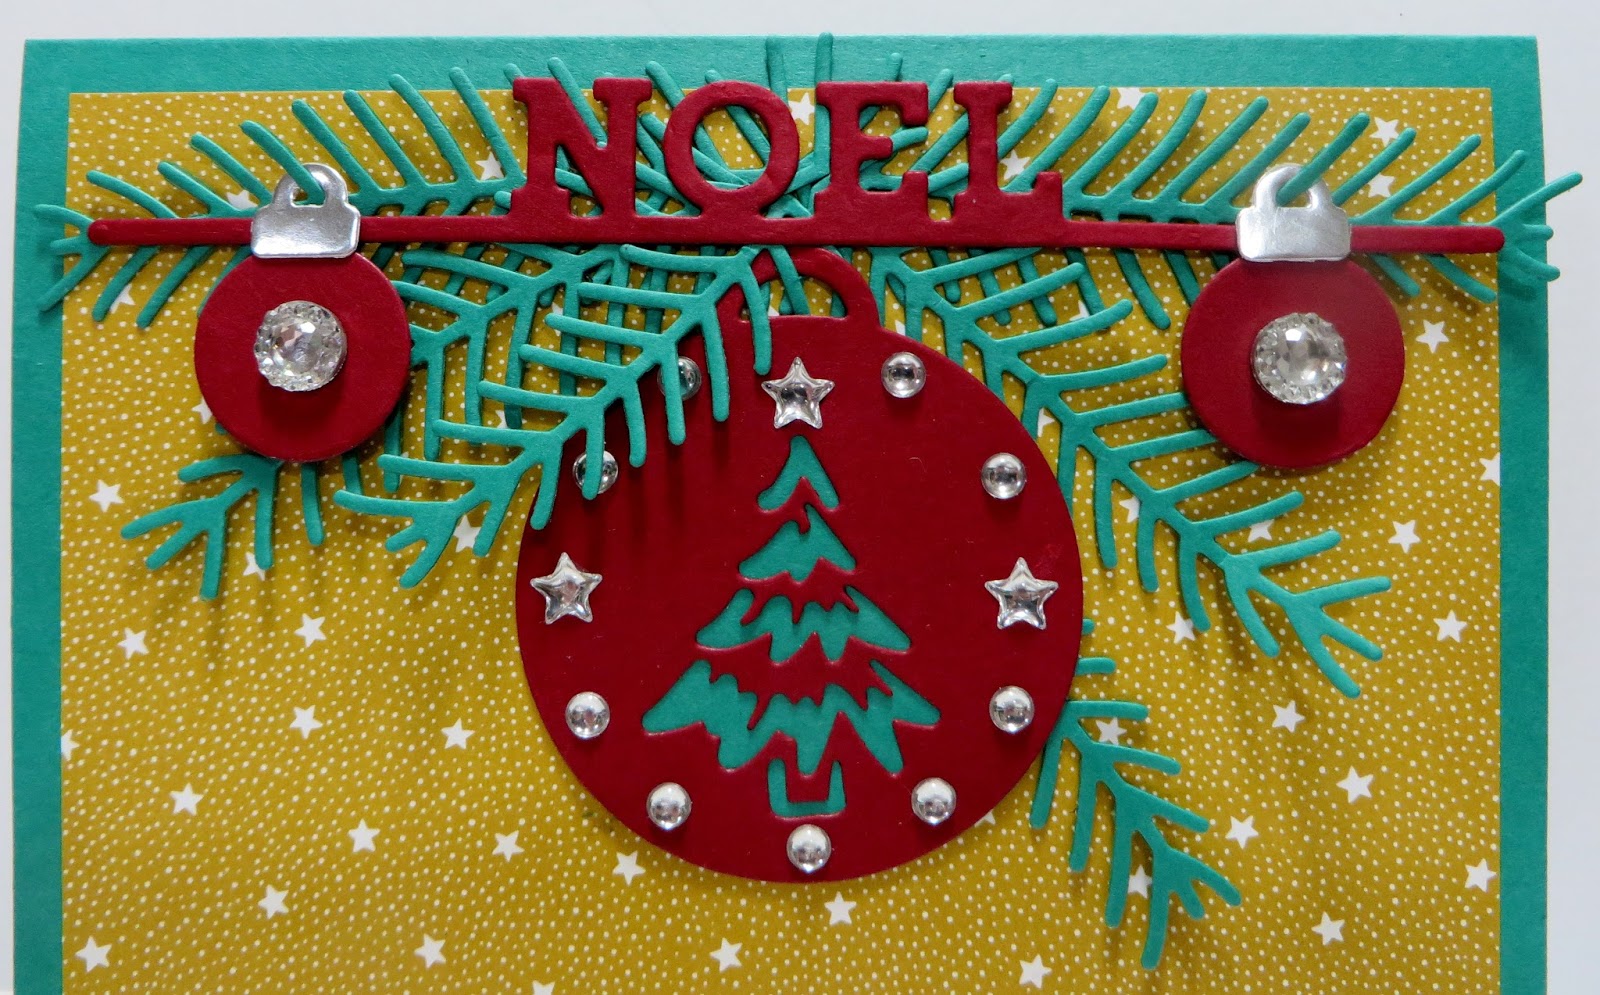
My share for today is a Christmas card that I designed using Stampin' Up's Christmas Pines Stamp Set, Presents and Pines Designer Series Paper and Christmas Stockings and Pretty Pines Thinlits Dies and Merry Tags and Layering Ovals Framelits Dies.
Let's take a look:
I am just LOVIN' Stampin' Up's Presents and Pinecones Designer Series Paper and Emerald Envy Cardstock!!! The Emerald Envy color is so unique and absolutely gorgeous combined with SU's Presents and Pinecones DSP. A non-traditional color scheme!
My card base is Emerald Envy Cardstock cut at 5-1/2" x 8-1/2" and scored and folded at 4-1/4".
My card front panel is the Star piece from Presents and Pinecones Designer Series Paper cut at 3-7/8" x 5-1/8" and adhered to my card base using Mono Multi-Purpose Glue. A non-traditional cut as I wanted an extra 1/8" border to show off the Emerald Envy Cardstock.
I die cut two of each of the Pine Branches (Small, Medium & Large) using SU's Pretty Pines Thinlits Dies from Emerald Envy Cardstock and adhered them to my card front panel as shown in the picture above.
Using SU's Christmas Stockings Thinlits Dies, I die cut the Noel image from Cherry Cobbler Cardstock and adhered the center only of the Noel die cut over my Pine Branches with Mono Multi-Purpose Glue. I left the ends of the Noel die cut free so I could add the smaller bulbs over the ends and adhere it then.
Using SU's Merry Tags Framelits Dies, I die cut Tree Christmas Bulb image from Cherry Cobbler Cardstock and the Solid Christmas Bulb from Emerald Envy Cardstock. I adhered the Cherry Cobbler die cut to the Emerald Envy die cut and to my card in the Pine Branches using Mono Multi-Purpose Glue.
I die cut the smallest Christmas Bulb twice from Cherry Cobbler Cardstock and the Caps twice from SU's Silver Foil Sheet. I adhered the Caps to the Bulbs and slid them over the ends of the Noel die cut and adhered them down with a Stampin' Dimensional. Then, I adhered the ends of the Noel die cut down using Mono Multi Purpose Glue to keep the small Christmas Bulbs from falling off.
For the inside of my card:
Using SU's Layering Ovals Framelits Dies, I die cut a Scalloped Oval from Cherry Cobbler Cardstock and an Oval from Delightful Dijon Cardstock. I adhered the Delightful Dijon Oval to the Cherry Cobbler Scalloped Oval and to the inside of my card with Mono Multi-Purpose Glue.
I stamped my sentiment from SU's Christmas Pines in Emerald Envy Ink.
I purchased some Iced Rhinestones (Retired) from SU's Clearance Rack; but, I see they are gone now. You have to be quick when it comes to the Clearance Rack. I adhered two of the largest Iced Rhinestones to the center of the smallest Christmas Bulbs.
And, of course, another of my FAVE's, Enamel Shapes!!! I adhered the Silver Circle and Star Shapes to the Tree Christmas Bulb.
That's all I have for today. Thanks for stopping by my blog!
I
recently discovered that people are using my cards and/or projects,
duplicating them and entering them into challenges and using them for their own card classes. My cards and
projects are my own creations and are not to be used in challenges, blog hops, card classes or
sold at craft shows; etc., for profit. I don't mind if you duplicate my
creativity to pass on to family members or friends as gifts or Occasions
cards; but, PLEASE be considerate of others creativity! Thank you!
If you are
interested in purchasing Stampin' Up products, you can order from me
on-line at www.stampinup.com and please choose me, Lynn Gauthier, as
your Demonstrator.
This is my first blog and it is still under construction. I have yet to receive my Watermark so the picture's
are copyright Lynn A. Gauthier, 2015-2016 Stampin' Up.
Yup...It's Fall time! It's only 60 degrees at noon time. We ended up turning our furnace on last night...Brrrrr.....
It was mostly a nice, cool, sunny weekend. We got a lot of work done this weekend and the weekend just flew by!!! We picked peaches off our peach tree too!
I'm so glad that we got to the peaches before the raccoons and other critters did!!!
I did have some time to play during the Baseball and Football games. So, my share today is a card I designed using Stampin' Up's Pretty Pines and Christmas Stockings Thinlits Dies and Lots of Labels Framelits Dies. I didn't stamp a sentiment on the inside of my card yet so I didn't use any stamp sets on this card.
Let's take a look:
My card base is Stampin' Up's Emerald Envy Cardstock cut at 5-1/2" x 8-1/2" and scored and folded at 4-1/4".
My card front panel is the striped piece of DSP from Stampin' Up's Presents & Pinecones Designer Series Paper cut at 3-7/8" x 5-1/8" and adhered to my card base with Mono Multi-Purpose Glue.
Using SU's new Pretty Pines Thinlits Dies, I die cut the Pine Branches from Emerald Envy Cardstock and adhered them to my card front panel using Mono-Multi Purpose Glue.
Again using SU's Pretty Pines Thinlits Dies, I die cut the largest Solid Pinecone image twice from Early Espresso Cardstock.
I die cut the Pinecone Detailed image twice from Stampin' Up's new Copper Foil Sheets and adhered them to the Solid Pinecone images using SU's Fine Tip Glue Bottle.
I adhered the Pinecones to the Pine Branches using Mono Multi-Purpose Glue and a 1/2 of a Stampin' Dimensional under the tip of the Pinecone on the right to give it a little height.
I die cut the largest Bow from Cherry Cobbler Cardstock and adhered it above the Pine Branches with a tiny piece of a Stampin' Dimensional.
Using my 3/8" Handheld Hole Punch, I punched a circle from a scrap piece of the Copper Foil Sheet and adhered it to the center of the Bow with Mono Multi-Purpose Glue.
Using SU's Christmas Stockings Thinlits Dies, I die cut the Noel die from Cherry Cobbler Cardstock and adhered it to the bottom edge of my card front panel with Mono Multi-Purpose Glue.
For the inside of my card:
Using SU's Lots of Labels Framelits Dies, I die cut a Label from Cherry Cobbler Cardstock.
Using SU's Layering Ovals Framelits Dies, I die cut an Oval from Whisper White Cardstock. I adhered the Oval to the Label and then to the inside of my card with Mono Multi-Purpose Glue.
Using Pretty Pines Thinlits Dies, I die cut the smallest Bow from Cherry Cobbler Cardstock and the Sprig from Emerald Envy Cardstock. I adhered both to the Label with Mono Multi-Purpose Glue.
A very clean and simple card with a ton of gorgeous, detailed impact!!!
The Copper Foil Sheets are another of my Fave's!!! I just LOVE the shine and elegance it gives to a card, project or layout!!!
That's all I have for today. Thanks for stopping by my blog!
I
recently discovered that people are using my cards and/or projects,
duplicating them and entering them into challenges and using them for their own card classes. My cards and
projects are my own creations and are not to be used in challenges, blog hops, card classes or
sold at craft shows; etc., for profit. I don't mind if you duplicate my
creativity to pass on to family members or friends as gifts or Occasions
cards; but, PLEASE be considerate of others creativity! Thank you!
If you are
interested in purchasing Stampin' Up products, you can order from me
on-line at www.stampinup.com and please choose me, Lynn Gauthier, as
your Demonstrator.
This is my first blog and it is still under construction. I have yet to receive my Watermark so the picture's
are copyright Lynn A. Gauthier, 2015-2016 Stampin' Up.
Well, it sure does look like Fall is setting in. It's cloudy, drizzly and leaves are starting to fall from the trees. I'm sure not looking forward to the cold and white stuff!!!
My share for today is a Halloween Gift Bag Treat Holder that I made using Stampin' Up's Sketched Dots Tag a Bag Gift Bags that are in the Clearance Rack. SU's Clearance Rack was updated last week and they still have loads of treasures to take advantage of! I also used Stampin' Up's new Spooky Fun, Halloween Treat and Sweet Home Stamp Sets and Halloween Scenes Edgelits and Home Sweet Home Thinlits Dies.
Let's take a look:
This was a fun treat holder to make! I made them for my Great Niece and Great Nephew. Ya' see, I'm not just a Good Aunt; I'm a Great Aunt!!! =)
I'm very happy with the way it turned out and I'm sure the Kids will enjoy it! I put some of their FAVE candies in the pockets!
I trimmed off the bottom 1/2" of one of SU's Sketched Dots Gift Bags (Retired but still available in the Clearance Rack) and folded it over onto itself about 1/4" down from the top edge. This makes the gift bag have two pockets to put your treats in. And then I made a Belly Band to hold it closed.
I've not heard of Air Heads candy before and when I tried one, it was just too sour for this Girl! Phew! Anyways, the Air Heads candy is in the first pocket and then some spooky Skull and Bones Sweet Tarts in the back pocket. Sour must be in for Kids now-a-days!
For the Belly Band:
I trimmed out a piece of SU's Garden Green Cardstock at 1/2" x 11", folded it around the filled Gift Bag and adhered it in the back with Mono Multi-Purpose Glue.
Using SU's Halloween Scenes Edgelits Dies, I die cut Fence and Tree from Basic Black Cardstock. I adhered the Fence die cut to the Belly Band with Mono Multi-Purpose Glue and then the Tree die cut with Stampin' Dimensionals.
I wrapped SU's Halloween Night Orange and Black Baker's Twine around the Belly Band twice and tied it in a pretty bow in the front.
Using SU's Spooky Fun Stamp Set, I stamped the Headstones in Basic Black Archival Ink onto Smokey Slate Cardstock and the Pumpkin Faces onto Pumpkin Pie Cardstock. I then die cut them out again using Halloween Scenes Edgelits Dies and adhered them to the Tree and Fence die cuts using Mono Multi-Purp.ose Glue.
I put the Belly Band on to my pocket filled Gift Bag Treat Holder.
Using SU's Sweet Home Stamp Set, I stamped the Ghost onto Whisper White Cardstock with Basic Black Archival Ink.
Using SU's Home Sweet Home Thinlits Dies, I die cut the stamped Ghost out and then a Bat from Basic Black Cardstock.
Using SU's 1-1/2" Circle Punch, I punched a circle from SU's Pumpkin Pie Glimmer Paper. I adhered the Circle to the right side of the Gift Bag Treat Holder and the Bat to the Circle with Mono Multi-Purpose Glue.
I adhered the Ghost to the left side of the Gift Bag Treat Holder with Mono Multi-Purpose Glue.
I trimmed out a piece of Pumpkin Pie Cardstock at 4-1/4" x 3-1/4 for a little Note Card.
I stamped SU's Halloween Treat Stamp onto the Cardstock with Garden Green Ink.
Using SU's Note Tag Punch (Retired), I punched a Tag from Basic Black Cardstock and stapled it to the Note Card for a Pull Tab to pull the Note Card out of the pocket.
I used my Signo White Gel Pen and hand wrote BOO on the Tag and then tucked the Note Card in the very back of the back pocket.
And, there you have it! A quick and easy Gift Bag Treat Holder that did not take long at all to put together.
That's all I have for today. Thanks for stopping by my blog! Have a great weekend!
I
recently discovered that people are using my cards and/or projects,
duplicating them and entering them into challenges and using them for their own card classes. My cards and
projects are my own creations and are not to be used in challenges, blog hops, card classes or
sold at craft shows; etc., for profit. I don't mind if you duplicate my
creativity to pass on to family members or friends as gifts or Occasions
cards; but, PLEASE be considerate of others creativity! Thank you!
If you are
interested in purchasing Stampin' Up products, you can order from me
on-line at www.stampinup.com and please choose me, Lynn Gauthier, as
your Demonstrator.
This is my first blog and it is still under construction. I have yet to receive my Watermark so the picture's
are copyright Lynn A. Gauthier, 2015-2016 Stampin' Up.