Our weather is gradually warming up each day now! I can't wait to hit another 70 plus degree day which hopefully is tomorrow.
First off, I'd like to share some Wild Turkey pictures that I took in my yard last week. It's mating season for the Wild Turkey and it's so fun to watch the males and their display of 'courtship'!
This is the hen Turkey.
And, the male Tom Turkey in full display following the hen.
Two more Tom Turkey's. Such a gorgeous bird. Hope you enjoy the pictures!
O.K., today, I'm sharing the fourth All Occasion Card that I designed using Stampin' Up's Shine On Designer Series Paper and Happy Happenings Stamp set.
Let's take a look:
Isn't that cool paper!!! I just LOVE the silver foil outlined gems in this paper.
My card base is Stampin' Up's Basic Black Cardstock cut at 8-1/2" x 5-1/2" and scored and folded at 4-1/4".
My front card panel is SU's Shine On Designer Series Paper cut at 4" x 5-1/4" and adhered to my card base using Mono Multi-Purpose Glue.
I adhered one of SU's White Tea Lace Doily's to the center of my card front panel using Mono Multi-Purpose Glue.
I adhered one of SU's Silver Foil Doily's to the center of the White Doily using Mono Multi-Purpose Glue.
Using SU's
Happy Happenings Stamp Set, I stamped Happily Hitched in VersaMark on to
SU's Whisper White Cardstock. I then sprinkled SU's Smokey Slate
Embossing Powder over it and heat set it using my SU Heat Tool.
I
trimmed out a piece of Basic Black Cardstock at 1-1/2" x 2-1/2" and
slid each end into SU's Note Tag Punch and punched each end. I did the
same with a piece of Silver Foil and and the embossed Whisper White piece and made each one a
1/4" shorter than the others.
I adhered the Black Tag to the center of the silver doily and the Foil Tag to the Black Tag using Mono Multi-Purpose Glue.
The White Tag was adhered to the Foil Tag using Stampin' Dimensionals.
I tied a piece of SU's White Glitter Ribbon (Retired but I think it may still be in the Clearance Rack) in a knot and adhered it to the top of my tags using Mono Multi-Purpose Glue.
Please stop by tomorrow and I'll share with you the card box for these All Occasion Cards.
Thanks for stopping by my blog!
I
recently discovered that people are using my cards and/or projects,
duplicating them and entering them into challenges and using them for their own card classes. My cards and
projects are my own creations and are not to be used in challenges, blog hops, card classes or
sold at craft shows; etc., for profit. I don't mind if you duplicate my
creativity to pass on to family members or friends as gifts or Occasions
cards; but, PLEASE be considerate of others creativity! Thank you!
If you are
interested in purchasing Stampin' Up products, you can order from me
on-line at www.stampinup.com and please choose me, Lynn Gauthier, as
your Demonstrator.
This is my first blog and it is still under construction. I have yet to receive my Watermark so the picture's
are copyright Lynn A. Gauthier, 2015-2016 Stampin' Up.
We are pretty much supposed to have an all day rain today and I have some errands to run. Ugh!
Today, I'll be sharing with you the third card in my All Occasions Card Series that I designed using Stampin' Up's Shine On Designer Series Paper, Balloon Bouquet Punch, Cherry On Top Washi Tape and the new Paper Pumpkin Monthly Kit Stamp Set called All About Everything.
Let's take a look:
LOVE that Bermuda Bay color!
My card base is SU's Bermuda Bay Cardstock cut at 4-1/4" x 11" and scored and folded at 5-1/2"
My card front panel is SU's Shine On Designer Series Paper cut at 4" x 5-1/4" and adhered to my card base using Mono Multi-Purpose Glue.
I evenly layered rows of SU's Cherry On Top Washi Tape onto a piece of Bermuda Bay Cardstock and then punched out balloons using SU's Balloon Bouquet Punch.
I took a piece of Bermuda Bay/Basic Black Thick Baker's Twine and pulled out all of the Bermuda Bay threads leaving just the black threads. I taped one end of the baker's twine to the back of each balloon, wrapped it around each balloon's stem and taped it down on the back again leaving a good portion of the twine hanging down for the balloon's string.
I adhered the two small balloons to the card front panel using Mono Multi-Purpose Glue and the large balloon using Stampin' Dimensionals.
For the
sentiment, I used SU's new Monthly Paper Pumpkin Kit Stamp Set called
All About Everything. I stamped Happy Birthday on Bermuda Bay Cardstock
with Black Memento Ink, cleaned my stamp, laid my stamp back over the
sentiment and traced around it. I then fussy cut the sentiment out.
Pretty neat, huh!!!
I adhered my sentiment over the balloon strings on my card using Stampin' Dimensionals.
I randomly added sequins around my card using SU's Fine Tip Glue Bottle.
What fun DSP this is to play with!!!
Please come back tomorrow and I'll share with you the fourth card from my All Occasions Card Series using Stampin' Up's Shine On Designer Series Paper.
Thanks for stopping by my blog!
I
recently discovered that people are using my cards and/or projects,
duplicating them and entering them into challenges and using them for their own card classes. My cards and
projects are my own creations and are not to be used in challenges, blog hops, card classes or
sold at craft shows; etc., for profit. I don't mind if you duplicate my
creativity to pass on to family members or friends as gifts or Occasions
cards; but, PLEASE be considerate of others creativity! Thank you!
If you are
interested in purchasing Stampin' Up products, you can order from me
on-line at www.stampinup.com and please choose me, Lynn Gauthier, as
your Demonstrator.
This is my first blog and it is still under construction. I have yet to receive my Watermark so the picture's
are copyright Lynn A. Gauthier, 2015-2016 Stampin' Up.
What a gorgeous day again today. Supposed to be almost 70 and ya' just gotta' love that sunshine. Tomorrow will bring rain.
I
went to look for morale mushrooms yesterday; but, it's still too
early. I kicked up 3 deer and one Canadian Goose; who let everyone and
his brother know that I was coming. Gosh, they are LOUD honkers!
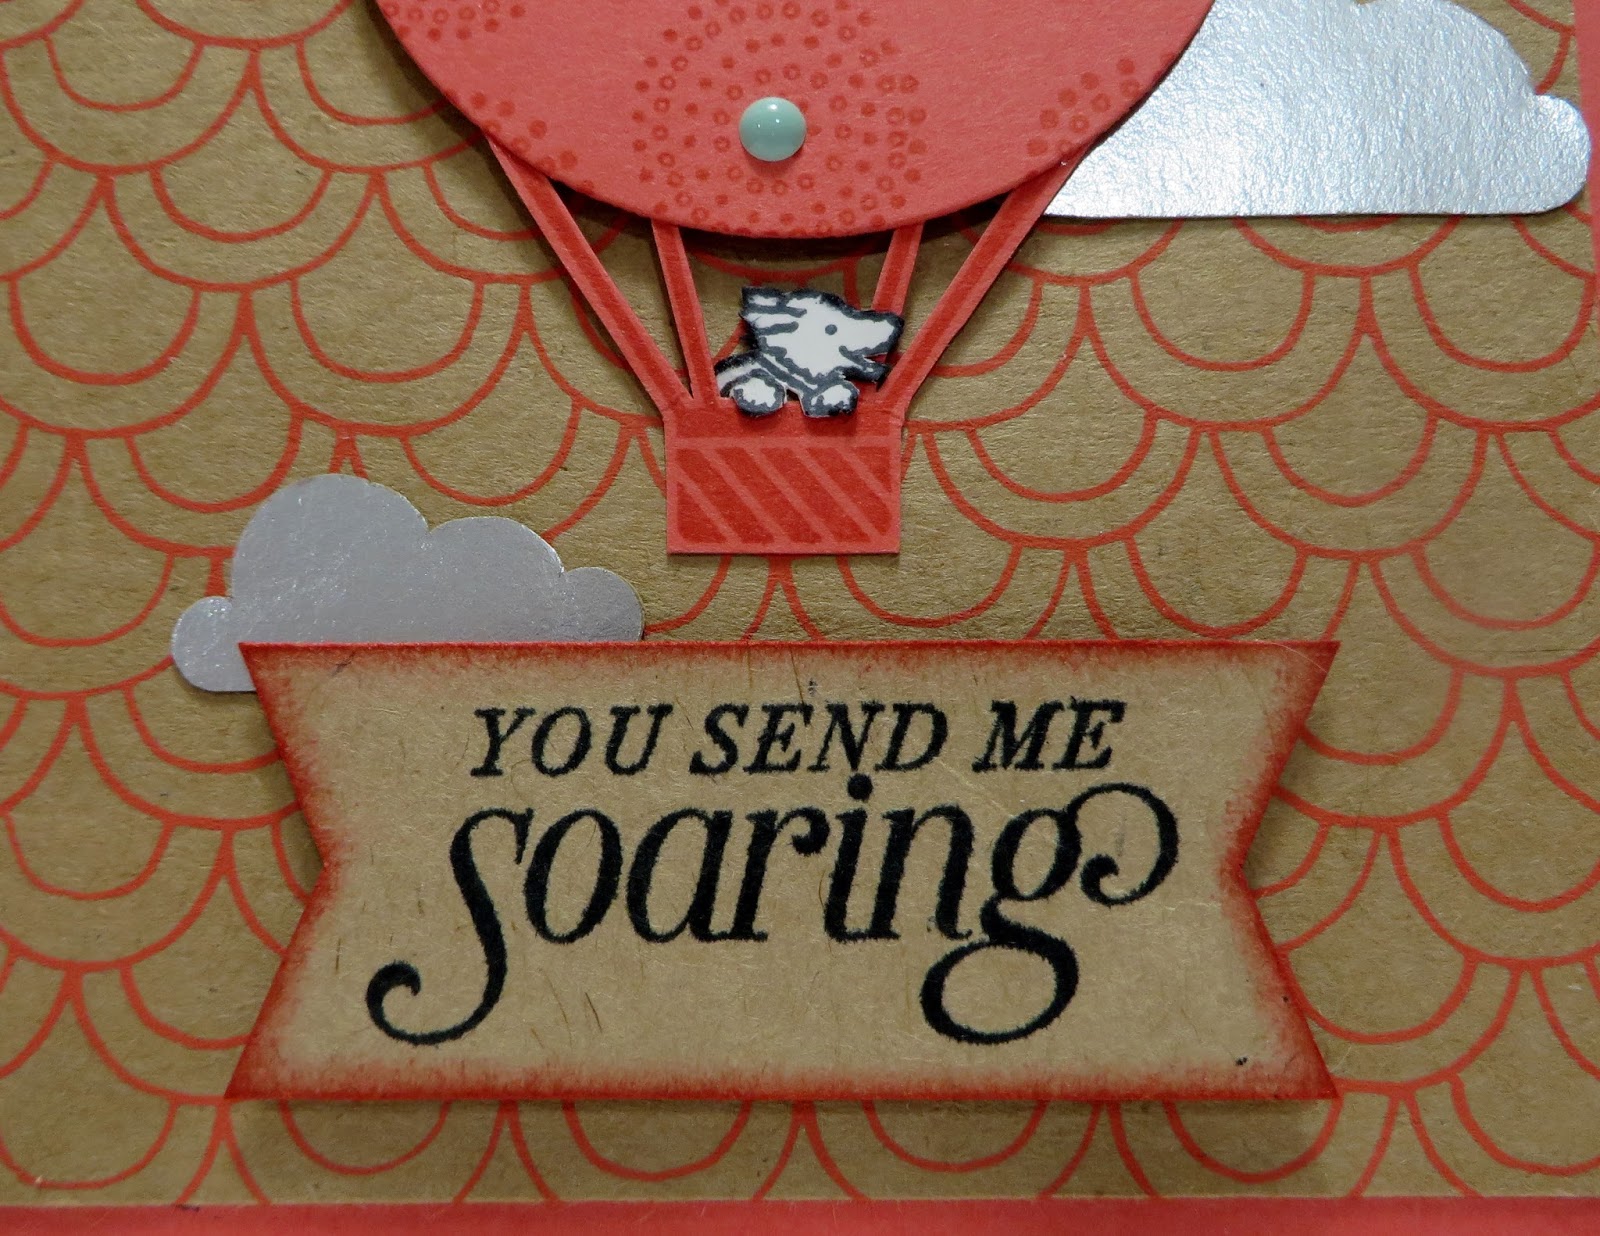
I'm really excited as I get to pre-order from Stampin' Up's 2016-2017 Annual Catalog today. I cannot believe the amazing products that are coming out this time around. If you think this little Pooch from SU's Beautiful Ride is cute; wait until you see the new cat and dog fur baby sets available June 1st!!! Too Stinkin' Cute!!!
My second card of my All Occasion Card Series this week uses Stampin' Up's Shine On Designer Series Paper, Balloon Framelits and Balloon Celebration, Beautiful Ride and Sky is the Limit Stamp Sets.
Let's take a look:
This little fur baby of a pooch has been all over on cards; in car windows, bicycle baskets and going for a hot air balloon ride. Isn't he precious!
My card base is Stampin' Up's Watermelon Wonder Cardstock cut at 4-1/4" x 11" and scored and folded at 5-1/2".
My card front panel is cut at 4" x 5-1/4" from SU's Shine On Designer Series Paper and adhered to my card base using Mono Multi-Purpose Glue.
Using SU's Balloon Framelits Dies, I die cut the BIG balloon from Watermelon Wonder Cardstock. I stamped the Balloon's Basket in Watermelon Wonder Ink and die cut it out with the Balloon Framelits Dies.
I stamped the dotted swirls from SU's Balloon Celebration Stamp Set on the balloon with Watermelon Wonder Ink. I adhered the basket to the balloon using Mono Multi-Purpose Glue.
I stamped the little dog from SU's Beautiful Ride Stamp Set on SU's Whisper White Cardstock using Memento Black Ink. I fussy cut the dog out and adhered him in the balloon's basket using Mono Multi-Purpose Glue.
Using Stampin' Dimensionals, I adhered the basket to my card front panel.
I adhered some enamel dots from Sale-a-Bration and one from SU's Perfect White Accents to my balloon.
I fussy cut some of the foil clouds out of another piece of the Shine On DSP and adhered them randomly to my card front panel using Mono Multi-Purpose Glue.
I stamped my sentiment from SU's Sky is the Limit Stamp Set in Black Memento Ink on SU's Kraft Cardstock and trimmed out a banner at 1" x 2-1/2". I sponged around the edges using Watermelon Wonder Ink and adhered it to my card with Stampin' Dimensionals.
That's all I have for today! Please come back tomorrow for another card in my All Occasions Card Series.
Thanks for stopping by my blog!!!
I
recently discovered that people are using my cards and/or projects,
duplicating them and entering them into challenges and using them for their own card classes. My cards and
projects are my own creations and are not to be used in challenges, blog hops, card classes or
sold at craft shows; etc., for profit. I don't mind if you duplicate my
creativity to pass on to family members or friends as gifts or Occasions
cards; but, PLEASE be considerate of others creativity! Thank you!
If you are
interested in purchasing Stampin' Up products, you can order from me
on-line at www.stampinup.com and please choose me, Lynn Gauthier, as
your Demonstrator.
This is my first blog and it is still under construction. I have yet to receive my Watermark so the picture's
are copyright Lynn A. Gauthier, 2015-2016 Stampin' Up.
I'm so happy to see the sun shining today. It was quite dreary and rainy all weekend. This Friday is looking like the best day for us. Forecasters say we are supposed to have a full on sun day and a high of 72. Perfect weather to get my flower beds cleaned out!
Today, I will start my share of 4 occasion cards that I designed using Stampin' Up's Shine On Designer Series Paper, Floral Frames Collection Framelits and Itty Bitty Accents Punch Pack. I'm so sad to see these on Stampin' Up's Retiring List. These products are some of my FAVE's that I use a lot.
Here's my first card:
I have to admit that I didn't really like Stampin' Up's Shine On Designer Series Paper until I got it in my hands and saw it in person. Now, it's almost gone and I consider it as one of my absolute favorites. It's a heavier cardstock almost like SU's Kraft Cardstock and the sheets really do have a 'SHINE' quality to them. The bright and bold colors are just scrumptious!!!
My card base is SU's Cucumber Crush Cardstock cut at 5-1/2" x 11" and scored and folded at 4-1/4". My front panel is a piece of SU's Shine On DSP cut at 5-1/4" x 4" and adhered to my card base with Mono Multi-Purpose Glue.
I trimmed out 2 pieces of Cucumber Crush Cardstock at 4" x 1/2" and adhered them towards the top and bottom of my card front panel using Stampin' Dimensionals.
I die cut the 3 smallest dies from SU's Floral Frames Collection Framelits; the two largest from SU's Watermelon Wonder and the smallest from SU's Cucumber Crush Cardstock.
Using SU's Circle of Spring Stamp Set, I stamped 'for you' in the center of the Cucumber Crush flower die cut using Memento Black Ink.
I took a piece of SU's Bermuda Bay 1-1/4" Striped Grossgrain Ribbon, cut it in between the stripes and pulled out all of the Bermuda Bay threads leaving just the White threads. I then adhered them to the front of each Watermelon Wonder flower die cut using Mono Multi-Purpose Glue.
Using Stampin' Dimensionals, I adhered all 3 die cuts together. I even put Stampin' Dimensional on the back of the largest floral die cut; but, I didn't remove the backing. I did this so I could give the flower some height, yet it could swing freely from its bow hanger.
I took a long piece of Melon Mambo/Basic Black Two-Tone Baker's Twine and pulled out the Melon Mambo threads leaving just the black. I punched a hole in one of the petals of the flower, put the twine through the hole and under the top strip of Cumber Crush Cardstock and tied it into a pretty bow.
And, I punched 5 flowers using the flower punch from SU's Itty Bitty Accents Punch Pack from Watermelon Wonder Cardstock and adhered 3 to the bottom strip and 2 to the top strip of Cucumber Crush Cardstock using small pieces of Stampin' Dimensionals.
Using a Black Sharpie, I colored 5 of SU's White Perfect Accents and, after they were dry, I adhered them to the centers of the flowers.
I'm quite happy with the way my card turned out. I really like how the flower can swing freely from its hanger. Something different!
That's all I have for today. Please come back the rest of this week to see the rest of my cards and a card box that I'll share with you on Friday!
Thanks for stopping by my blog!
I
recently discovered that people are using my cards and/or projects,
duplicating them and entering them into challenges and using them for their own card classes. My cards and
projects are my own creations and are not to be used in challenges, blog hops, card classes or
sold at craft shows; etc., for profit. I don't mind if you duplicate my
creativity to pass on to family members or friends as gifts or Occasions
cards; but, PLEASE be considerate of others creativity! Thank you!
If you are
interested in purchasing Stampin' Up products, you can order from me
on-line at www.stampinup.com and please choose me, Lynn Gauthier, as
your Demonstrator.
This is my first blog and it is still under construction. I have yet to receive my Watermark so the picture's
are copyright Lynn A. Gauthier, 2015-2016 Stampin' Up.